Use case - Set up a realm administration
In this use case, we set up the realm administration environment for company X, including the two locations North and South.
Realm administration setup
- Two realms, corresponding with the users in locations North and South.
- One realms manager, who manages all realms, roles and delegations.
- A helpdesk staff employee per location/realm
- A user manager per location/realm
See the table and the figure below:
User | Role | Realm | Permissions | Where configured |
|---|---|---|---|---|
Realms manager |
| not applicable | Global role that allows to manage realms | In the IAM configuration |
|
| All available permissions | In the Adminapp | |
Helpdesk staff in location North |
|
| Permissions required for simple helpdesk tasks:
| In the Adminapp |
User manager in location North |
|
| Permissions required to manage end-users in the respective realm:
| In the Adminapp |
Helpdesk staff in location South |
|
| Permissions required for simple helpdesk tasks:
| In the Adminapp |
User manager in location South |
|
| Permissions required to manage end-users in the respective realm:
| In the Adminapp |
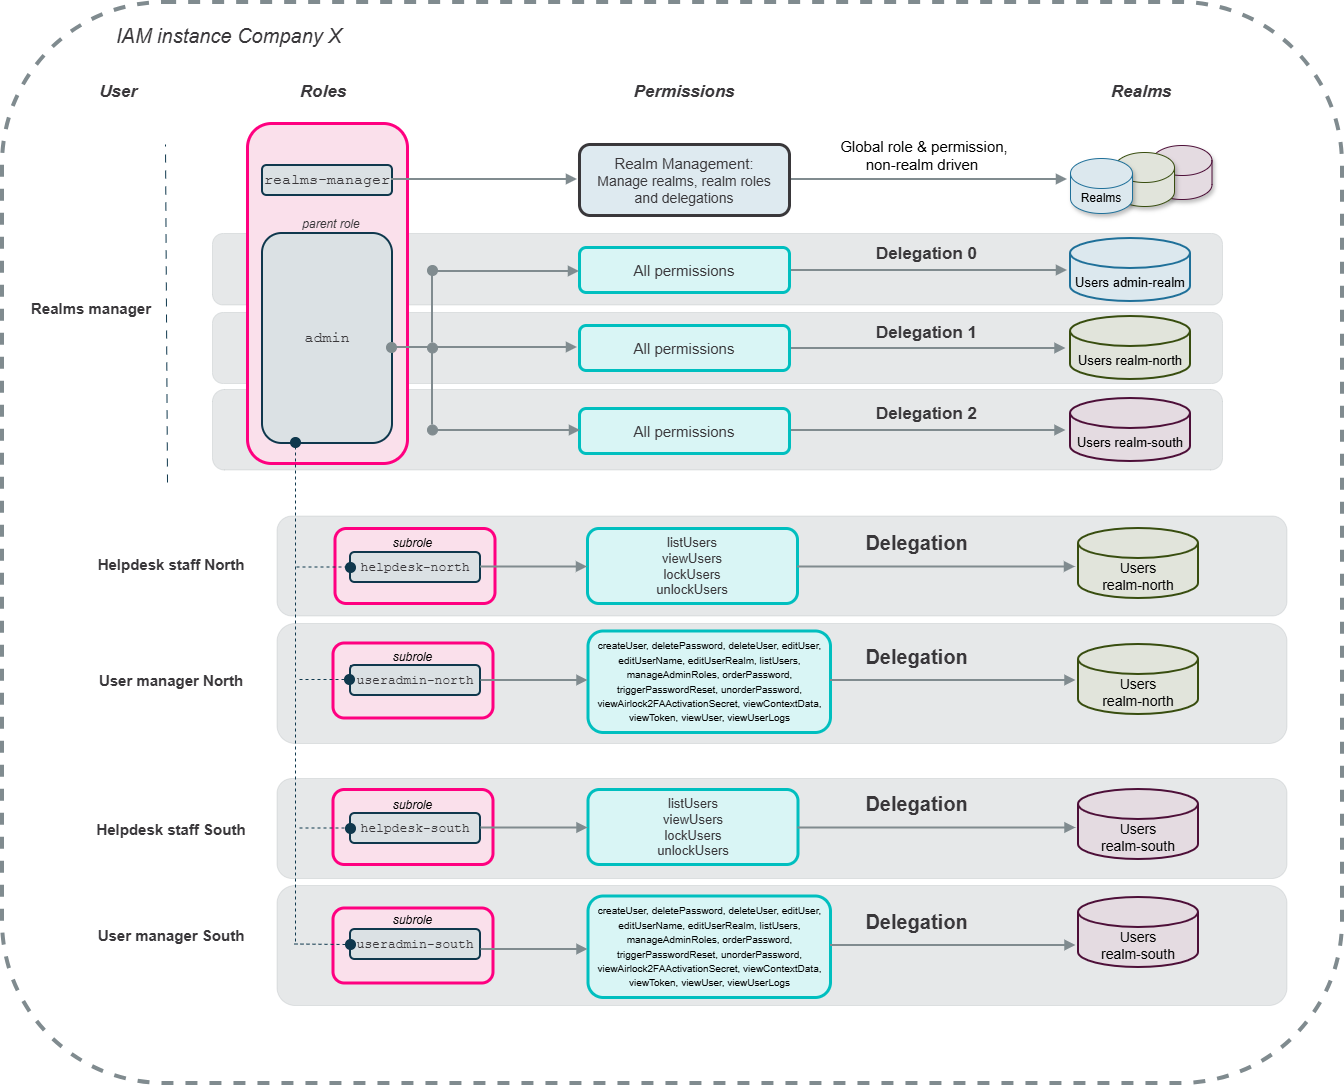
To build this realm administration setup:
- First, create a Realms Manager user who can create and edit all realm roles, realms and delegations.
- Next, build your realm administration environment.
Configure and create the Realms Manager user
You configure the Realms Manager user partly in the Config Editor, partly in the Adminapp.
Perform the following steps (as superadmin user).
In the Config Editor
Create the global realms-manager user role and assign it to the Realm Management actions. To do this, perform the following steps:
Create realms-manager user role
- In the Config Editor, go to
Adminapp >> Users - Scroll to the User Details Page - General section.
- Go to the Available User Roles property and add
realms-managerto the roles list.
Assign the realms-manager user role to Realm Management actions
- In the Config Editor, go to
Adminapp >> Access Control - Scroll to the Realm Management section.
- Enter
realms-managerto all listed actions (such as Create Realm Role, View Delegations). Do not change the properties Superadmin Role and Delegations Repository. - Activate your new configuration
In the Adminapp
Assign the “realms-manager” role to a user. Proceed as follows:
Create a Realms Manager user
- Log in as superadmin to the Adminapp and open the Users dialog.
- Open the Users details page of the first regular admin user you created during bootstrapping. This is the user who holds the “admin” realm role.
- Select the Profile tab and assign this user the “realms-manager” role.
- Your first admin user now holds the roles “admin” and “realms-manager”. Both roles are required to perform a Realms Manager function, see the table above.
Build the realm administration environment
Prerequisites
In our use case, building the realm administration environment can be done by all users that hold both the “admin” and “realms-manager” roles (see the table above).
Steps
Any realm manager can only assign and unassign
- Roles that they hold themselves, or that are subroles of the roles they hold.
- Within a specific realm: Permissions that they already have themselves through another delegation for this realm.
We must therefore
- First, link the “admin” role with each realm we want to create, holding all permissions, via delegations. In our use case, these are the realms “realm-north” and “realm-south”.
- Subsequently create the required roles as subroles of the “admin” role.
- Then connect each role with a realm and select the permissions relevant for the role in this realm, again via delegations.
- Finally, assign the realm roles to the respective users.
Proceed as follows:
- In the Adminapp, open the Realm Management dialog.
- Select the Delegations tab.
- Click Create Delegation to connect the “admin” role with realm “realm-north”.
In the Create Delegation window:
- Select the “admin” role.
- Create the new realm “realm-north”.
- Select all permissions.
- Click Create to create the delegation.
- Now create a second delegation to connect the “admin” role with realm “realm-south”:
- Click Create Delegation.
- Select the “admin” role.
- Create the new realm “realm-south”.
- Select all permissions.
- Create the delegation.
- Next, create the realm roles “helpdesk-north”, “useradmin-north”, “helpdesk-south”, and “useradmin-south”:
- In the Realm Management dialog, select the Realm Roles tab.
- Click Create Role.
- In the Create Realm Role window:
- Select “admin” as parent role.
- Enter the respective role name (helpdesk-north, useradmin-north, helpdesk-south or useradmin-south) in the Role Name field.
- Click Create to create the realm role.
- Repeat the above steps until you have created all roles.
- Next, connect each role with a realm and select the permissions relevant for the role in this realm, by creating delegations.
Perform the following steps for each realm role:
- Select the Delegations tab.
- Click Create Delegation.
- In the Create Delegation window:
- Select the respective role, e.g., “helpdesk-north”.
- Next, select the respective realm. For “helpdesk-north”, this is “realm-north”.
- Next, select the permissions required for this role in this realm, from the list. Here,
listUsers,viewUser,lockUser,unlockUser. See also the table above. - Click Create to create the delegation.
- Repeat the above steps for the roles “useradmin-north”, “helpdesk-south”, and “useradmin-south”.
- Create the user accounts for the users to which you want to assign these roles.
- Assign them the corresponding roles.