Configuration of realm-based access control
This article explains how to configure realm-based access control for a new IAM configuration without existing users.
To migrate an IAM configuration with existing data to realm-based access control, see Migration to realm-based access control.
The configuration order is:
- Configuration of realm-based access control
This is explained below. - Bootstrapping of your realm administration
This is explained in Bootstrapping a configuration in Realms mode.
Configure realm-based access control
Activating realm administration for a new IAM configuration includes a number of steps, among them the creation of a superadmin user, selection of realm administration as controlling mechanism for the Adminapp, as well as configuration of the delegation storage and the user persistence.
The list below contains all steps; each step links to the corresponding section explaining the step in detail. Perform each step to configure realm-based access control.
- Step 1: Load the start configuration
- Step 2: Create a superadmin user
- Step 3: (Optionally) Add the realm attribute to the user database
- Step 4: Reload the start configuration
- Step 5: Select the access controlling mechanism
- Step 6: Configure the delegations storage
- Step 7: Assign global, non-realm actions to the superadmin
- Step 8: Configure the user persistence
- Step 9: Remove incompatible and redundant elements
- Step 10: Enable Realm as user list and search attribute
- Step 11: Activate your configuration
- Step 12: Check if your configuration is successful
Step 1: Load the start configuration
First, load the initial IAM configuration, which is provided by Airlock. We will switch this configuration to Realms mode. Perform the next steps:
- Install IAM and initialize an IAM instance. For instructions, see Installation and upgrade.
- In the Config Editor, click the New icon in the menu bar on top of the page.
- In the next window, select the Start Configuration template. Click the Use Selected Template button.
- The start configuration is loaded. This may take some time.
- Activate the start configuration by clicking the Activate icon in the menu bar on top of the page.
Step 2: Create a superadmin user
To bootstrap your IAM instance in Realms mode, you need a user who has initial access to the Adminapp and can create your Realms environment including the required roles, realms and delegations. This user is the so-called superadmin.
Before actual creation of the superadmin user, you must first add the superadmin role and set the realm database attribute/column.
The instructions below cover all steps.
Step 2a: Add superadmin role
Because the start configuration does not include the superadmin role, you must first add this role to the roles list. Proceed as follows:
- In the Config Editor, go to
Adminapp >> Users. - Scroll to the User Details Page - General section.
- Go to the Available User Roles property and add the
superadminrole to the roles list.
Step 2b: Set the realm database attribute
In Realms mode, each admin/user must belong to a realm. The user's realm is stored in the users database. However, the start configuration (database) does not include a realm attribute/column or context data item. Therefore, this must also be created in advance. Perform the following steps.
Note: This substep explains how to set the realm attribute via the Config Editor. Alternatively, you could directly adjust the medusa_user database table, by manually setting the realm attribute on the specific user in the table. This should happen after you have created the superadmin user. See Step 3: (Optionally) Add the realm attribute to the user database. First, perform the steps below.
- Stay in the User Details Page - General section.
- Go to the Rows on User Detail Page property. Add a String User Profile Item plugin to the list. Edit the plugin as follows:
String User Profile Item plugin
- String Resource Key property: Set
realmas string resource key. - Property Name property: Set
realmas property name.
- String Resource Key property: Set
- Now go to
Adminapp >> Users >> User Data Source
This opens the User Store Configuration plugin dialog. - The User Store property has the Database User Store plugin set by default. Open the Database User Store plugin dialog.
- The Database User Persister property has the Database User Persister - Users on Database plugin set by default. Open the Database User Persister - Users on Database plugin dialog.
- In the Database User Persister plugin dialog, open the Context Data section. Add a String Context Data Item plugin to the Context Data Columns list. Edit the plugin as follows:
- In the Context Data Name property field, add a String Context Data Item Name plugin.
- In the String Context Data Item Name plugin dialog, enter
realmin the Context Data Name property field.
- Activate your configuration.
Step 2c: Create superadmin user
Additionally, create a user in the Adminapp, give this user the superadmin role and assign it to a realm. Proceed as follows:
- Open and reload the Adminapp, to apply the new configuration to the UI.
- Create a new user with Username “superadmin”.
- Open this user's Profile tab and edit the user as follows:
- realm property: Enter
admin-realm Note: The realm property is only available when you previously configured it in the Config Editor - see step 2b above. To manually adjust the
medusa_userdatabase table, perform Step 3: (Optionally) Add the realm attribute to the user database below. However, first finish step 2.- Assign the “admin” and “superadmin” roles to the user, by moving these roles from the Available roles list to the Active Roles list.
- Notice
The “admin” user role is available by default in the IAM instance configuration. In Realms mode, it will be the first realm role. The “superadmin” user role is the role you created in the previous substep 2a.
- Save the settings.
- realm property: Enter
- Open the superadmin user's Password tab. Go to the Set new password section.
- Set a new password for the user in the New password field.
- Repeat the password in the Confirmation field.
- Click Set new password to save the password. Keep the username and password in mind for later.
- You have now created a superadmin user. This user is required for bootstrapping your IAM instance in Realms mode, and for setting up your realm environment including the required roles, realms and delegations.
Step 3: (Optionally) Add the realm attribute to the user database
In Realms mode, each admin/user must belong to a realm. The user's realm is stored in the users database. Step 2b above explains how to set the realm attribute/column with the Config Editor. Alternatively, you could manually adjust the medusa_user database table. To do this, perform the following command on the medusa_user database table:
UPDATE medusa_user SET realm='admin-realm' WHERE username='superadmin';
Step 4: Reload the start configuration
First, you need to reload the start configuration to remove the settings from the previous steps. These settings were used to create the superadmin user, who is required to bootstrap the realm administration. To configure the realm administration itself, however, we need to start with a clean slate. By reloading the start configuration, the superadmin user remains in the user database, but the temporary configuration changes are removed.
- In the Config Editor, click the New icon in the menu bar on top of the page.
- In the next window, select the Start Configuration template. Click the Use Selected Template button.
- The start configuration is reloaded.
Step 5: Select the access controlling mechanism
The next step is to set realm administration as access controlling mechanism to the Adminapp.
- In the Config Editor, go to
Adminapp - In section Basic Settings, property Access Control, create a Delegation-based Access Control plugin. This plugin configures access controlling based on realms.
- Realms are now set as access controlling mechanism.
The next two steps illustrate how to configure the Delegation-based Access Control plugin.
Step 6: Configure the delegations storage
- In the Delegation-based Access Control plugin dialog, go to the Realm Management section, property Delegations Repository, and create a new Delegations Repository plugin. This plugin defines the repository settings for storing delegations and realm roles.
- The SQL Data Source property defines the database connection used to persist delegations and realm roles. Select the already available JDBC Connection Pool - H2 Database Connection plugin.
Step 7: Assign global, non-realm actions to the superadmin
- Except for the REST API section, each section in the Delegation-based Access Control plugin dialog stands for an action management group, for example, Authentication Token Management, Configuration Management or Realm Management. The properties in the sections represent the actions relevant for this management group.
- The Miscellaneous section includes the actions to view logs and licenses, and to access the Service Container.
- Enter
superadminin all action fields of all sections, except for - the (already configured) Delegations Repository field in the Realm Management section, and
- the REST Access Controller field in the REST API section; you can leave this field empty.
- Notice
This initial setting is required for bootstrapping IAM in Realms mode. After successful bootstrapping, you can assign suitable other global administrator roles to the actions.
Step 8: Configure the user persistence
In Realms mode, administrators are created as regular users. All users are stored in the same database table (medusa_user). Additionally, each user belongs to exactly one realm. The user's realm is also stored in the user database table medusa_user. Therefore, the realm column or attribute must be available in this database table.
To configure these settings, perform the following steps:
- In the Config Editor, go to
Adminapp >> Administrators >> Authenticator >> User Persister - In the plugin dialog, open the Table and Columns section.
- Go to the User Table Name property field and set
medusa_useras the user table name. - Through this setting, Adminapp users are authenticated against the
medusa_usertable (instead of themedusa_admintable).
- Through this setting, Adminapp users are authenticated against the
- Now go to
Adminapp >> Users >> User Data Source
This opens the User Store Configuration plugin dialog. - The User Store property has the Database User Store plugin set by default. Open the Database User Store plugin dialog.
- The Database User Persister property has the Database User Persister - Users on Database plugin set by default. Open the Database User Persister - Users on Database plugin dialog.
- In the Database User Persister plugin dialog, open the Table and Columns section. Scroll to the Col Realm property and enter
realmin the property field.
Step 9: Remove incompatible and redundant elements
Some elements in the current configuration are either redundant or incompatible with the Realms mode and must be removed. This includes:
- The Administrators Management plugin
The Administrators Management plugin is not compatible with the Realms mode; IAM will reject a configuration that includes this plugin upon validation/activation. To remove the plugin, perform the following steps: - Go to
Adminapp >> Administrators - In the Basic Settings section, go to the Adminstrators Management property. Make sure the property field is empty.
- Go to
- The “admin” user role
The “admin” role will be the first realm role to create in Realms mode and used to set up the realm administration environment. However, the “admin” role is also a user role available by default in the IAM instance configuration. Because the same role cannot be available both in the IAM configuration and in Realms Management (Adminapp), the role must be removed from the instance configuration. Proceed as follows: - Go to
Adminapp >> Users - In the Users Details Page - General section, go to the Available User Roles list. Remove the “admin” user role from the list.
- Go to
Step 10: Enable Realm as user list and search attribute
To add the Realm attribute as a column to the Adminapp's User List page, or to use it in the Adminapp's advanced user search, you need to configure some additional plugins. Proceed as follows:
- Go to
Adminapp >> Users - Go to the User List/Search page section.
- In the Columns In User List, add the Realm User Profile Item plugin. This will add Realm as a column to the User List page listing all available users.
- In the Advanced Search Filters list, add the Realm User Search Filter plugin. This will add Realm as a search option to the advanced user search, and enables filtering users of a specific realm.
Step 11: Activate your configuration
To enable the settings specified in the previous steps, activate your configuration in the Config Editor.
IAM will now switch in Realms mode.
Step 12: Check if your configuration is successful
To safely check whether the configuration was successful,
- Open the Adminapp in a private window, to persist the existing session in the other window.
- Log in with the superadmin user you previously created in Step 2: Create a superadmin user.
- You will be prompted to change the password. Change and confirm the new password.
- The Adminapp opens. If everything is correct, you will see the Realm Management menu item in the Menu bar on the left hand side. It contains the Realm Roles and Delegations tabs:
- If there is no Realm Management menu item, check whether the previous steps have been performed correctly and adjust your configuration if required.
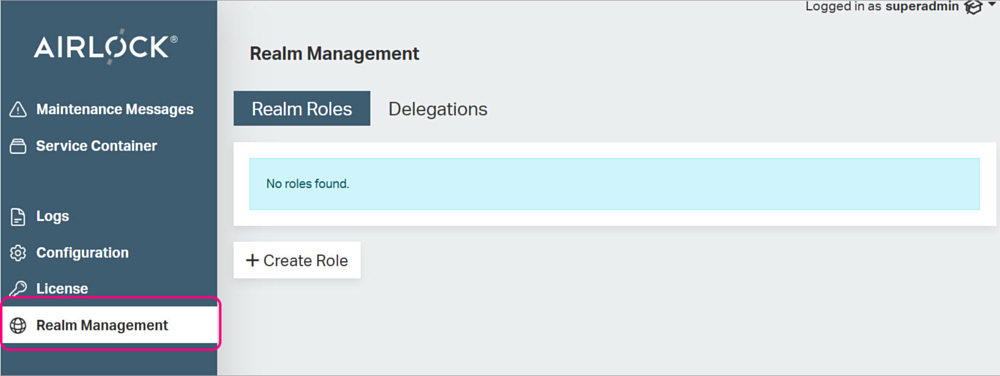
After successfully putting your IAM instance in Realms mode, continue with bootstrapping the realm administration. For instructions, see Bootstrapping a configuration in Realms mode.