Use case: FIDO passkey management
This article shows an example of how to manage end-users' FIDO credentials.
Goal
- Understand how authentication with FIDO can be enabled for an end-user.
- Understand how to manage end-users' FIDO passkeys.
- Learn how to prepare Airlock IAM for end-user token migration to FIDO.
All following procedures are exemplary and will vary according to your setup or needs.
Initial thoughts
The following examples use the Adminapp. A REST API for all administrative actions of the Airlock IAM Adminapp is available.
- All administrative actions shown below are subject to access control.
- We assume that the administrator working with the Adminapp has the necessary privileges to perform the actions. To verify this, review both your access control configuration in the Config Editor and the roles assigned to the respective administrator in the Adminapp (administrator's details view)
- Info
The access control configuration is defined in the Role-based Access Control dialog in the Config Editor (Adminapp >> Access Control). You assign administrator roles to administrative actions in this dialog.
Prerequisites
- The IAM Adminapp is configured, so end-users and authentication tokens can be managed.
- The FIDO Token Controller is configured in the IAM Adminapp.
- The administrator has the privileges (roles) to perform all shown actions.
- All examples are given on an existing end-user account.
Prepare user for migration to FIDO
This section shows how to prepare an end-user to migrate to Airlock 2FA as second authentication factor in the Adminapp. The next time the end-user logs in to your application, they will be prompted to migrate to the Airlock 2FA authentication method.
It is possible to perform the above procedure for multiple users at a time using the bulk change feature.
The bulk change feature is enabled in the Config Editor:
Adminapp >> Users >> Allow Bulk Changes.
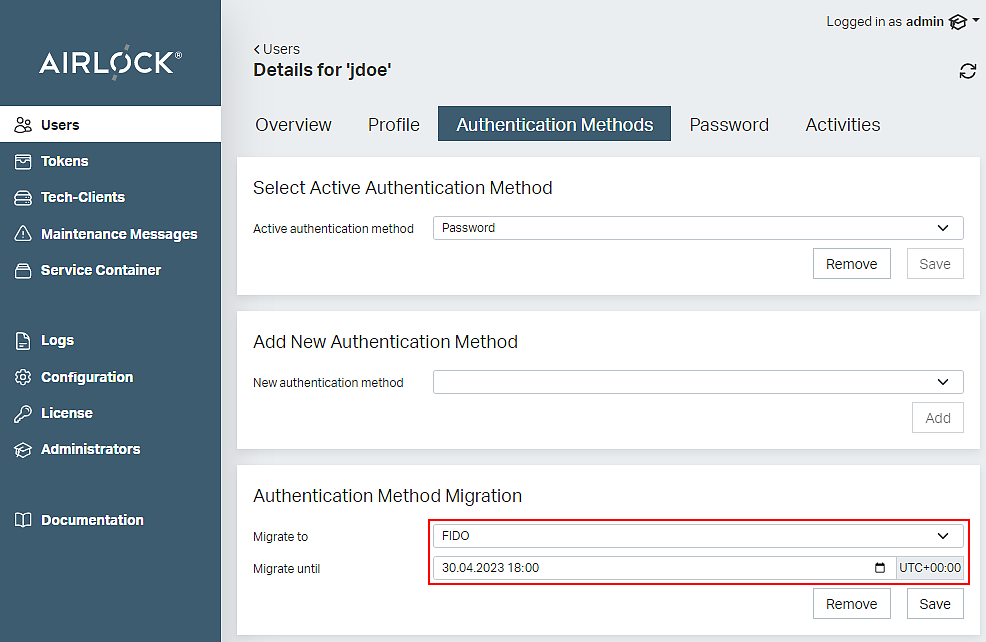
- Open the Authentication Methods tab in the end-user details.
- Select FIDO in the Authentication Method Migration section.
- Optionally set a due date in the field Migrate until.
- Click the Save button.
- Migration has been prepared – the end-user will be asked to migrate to FIDO at the next login.
Enable FIDO passkeys as 2nd factor
To manually set FIDO as the second factor, do the following.
Whether FIDO passkeys are used as a 2nd factor or in passwordless mode depends on the configured authentication flow.
Assumptions:
- The selection of the second authentication factor is based on the assigned auth method in the configured authentication flow.
- The end-user has registered at least one FIDO passkey for the IAM account.
- Info
Did you know...
- If no FIDO tab for the selected user is shown, the end-user has not yet registered a FIDO passkey for the IAM account. In this case, the end-user will not be able to log in using FIDO passkeys.
- FIDO passkeys cannot be added in the IAM Adminapp but only by the end-user using either the token migration or the FIDO registration self-service.
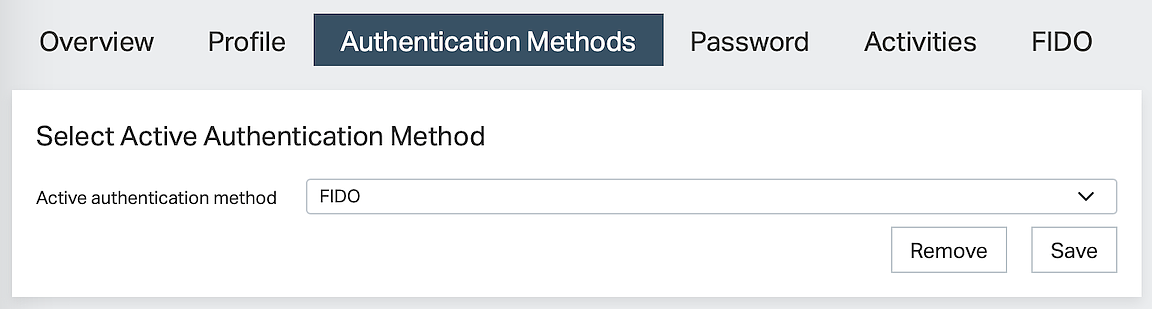
- Open the Authentication Methods tab in the user details.
- In the section Select Active Authentication Method, select FIDO and click the Save button.
- The active authentication method for the end-user is now set to FIDO.
FIDO credential management
The following example screenshot shows the FIDO tab with a FIDO passkey.
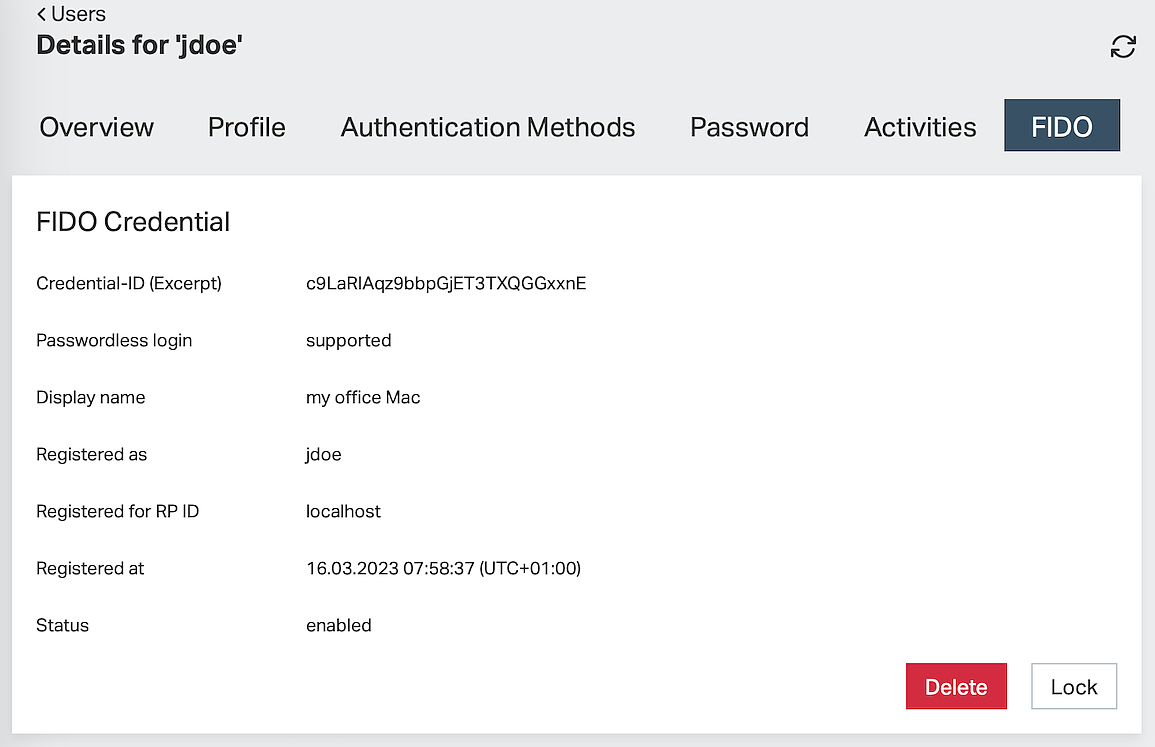
Displayed information:
- The information displayed per registered FIDO credential varies according to the information provided by the FIDO passkey.
- Airlock IAM can derive information about the Make and model based on the FIDO passkeys AAGUID. Unknown AAGUIDs are displayed as shown in the example screenshot. Unknown AAGUIDs may be mapped to meaningful strings in the IAM configuration.
Possible actions:
- Lock (or Unlock) a FIDO passkey:
If locked, the corresponding FIDO passkeys cannot be used anymore for authentication with the Airlock IAM account. - Delete FIDO passkey:
This will remove the FIDO passkey from the IAM account, i.e., unassign the FIDO passkey from the device. - Notice
This action cannot be undone. FIDO passkeys can only be associated with an IAM account by the user (not by the administrator) using a self-service.