OATH OTP authentication
Airlock IAM supports authentication with software- and hardware-based OATH OTP one-time passwords. This article explains how to configure this authentication method as second factor.
General features of OATH OTP in Airlock IAM:
- End-users can register OATH OTP devices in
- authentication flows,
- self-registration flows, and
- protected self-services.
- An administrator with appropriate authorization can use the Adminapp to
- delete an end-user's OATH OTP account,
- display the account registration code (the so-called shared secret), and
- generate or cancel an activation letter for an end-user.
Additional supported features:
- Auto-adjustment of time- or event-offset
- Configurable window size
- Encrypted storage of the shared secrets
There are two types of OTP generation algorithms:
We recommend using the newer and more secure algorithm TOTP.
When authenticating with TOTP (time-based one-time password), the end-user enters a digit code upon logging in to your application. The digit code changes every 30 seconds. It is provided by a mobile authenticator app of the user's choice. The following freely available authenticator apps have been tested and are known to work with Airlock IAM. Note that the apps are not tested continuously with every release.
Supported apps:
- Google Authenticator
- Microsoft Authenticator
- FreeOTP
- Duo Mobile
- HDE OTP
Airlock and Ergon are not responsible for the apps' security or proper functioning.
The following limitations apply when using OATH OTP in IAM:
- Only one OATH OTP account per user
- No import or export of externally stored shared secrets (e.g., for hardware devices)
- No own Airlock/Ergon smartphone authenticator app
- In multi-instance setups (e.g., active-active setups with load balancing), it is essential to externalize the session state. Otherwise, the detection of a replay attack, i.e., using the same OTP on multiple instances, may fail. For more information, see Externalize session state in multi-instance setups.
As an alternative to OATH OTP, you could use Airlock 2FA as a second factor. Airlock 2FA also offers OTP-based authentication. For more information, see Airlock 2FA as the second factor with IAM.
OATH OTP configuration and token management
- To configure OATH OTP as a second factor, see the sections “Configuring OATH OTP as a second factor” and “Activating OATH OTP authentication” below.
- For more information on OTP token management in the Adminapp, see section “Token management” at the end of this article.
Configuring OATH OTP as a second factor
To configure the OATH OTP authentication method and integrate it into your authentication flow as a second factor, perform the next steps.
- Go to
Main Settings >> Authentication Settings >> OATH OTP Settings - In the Basic Settings section, define the basic OATH OTP settings, such as the persister to store the token information (Credential Persister field), the token type (TOTP or HOTP; in the Token Type field), or the length of the one time password (Number of Digits field).
- Notice
We recommend using the newer and more secure algorithm TOTP.
- In the Administration Settings section, specify details of the OATH OTP authentication method in the context of the Adminapp, such as whether OATH OTP can be selected as next (migration) authentication method in the Adminapp, or how to show the shared secret in the Adminapp (as QR-, HEX, and/or Base32 code).
- Next, go to
Loginapp >> Applications and Authentication >> <your application> >> Authentication Flow - In the Steps list, create and edit a Selection Step plugin for second factor selection (if this has not been done yet). The plugin should be placed directly below your first factor authentication step (e.g., the Username Password Authentication Step). Give the plugin an easily recognizable display name (such as
Second Factor Selection). - In the Selection Step plugin dialog, go to the Basic Settings section. In the Available Options list, create and edit a Selection Option plugin for OATH OTP, as follows:
- Display Name field: Give the plugin an easily recognizable display name, such as
OATH OTP Selection Option. - Name field: Enter
OATH_OTPas authentication option name. - Steps field: Create an OATH OTP Authentication Step plugin. Leave the defaults.
- Condition field: Add an Active Authentication Method plugin with
OATH_OTPas authentication method.
- Display Name field: Give the plugin an easily recognizable display name, such as
- Activate your configuration.
- You have now configured OATH OTP as second factor authentication method.
Activating OATH OTP authentication
Activation of OATH OTP authentication happens by enrolling an authenticator app on the end-user's mobile phone. The activation is based on the so-called shared secret. IAM creates this shared secret when establishing OATH OTP for an end-user on the IAM authentication server. The shared secret is a binary string, but is shown to the end-user as either a QR code or in the Base32 format (Loginapp). Additionally, it is possible to display the secret as HEX in the Adminapp.
During the activation process, the end-user either scans the QR code with or manually enters the digital code into the authenticator app. The codes are provided by IAM during the activation flow.
Within IAM, there can only be one shared secret per end-user.
Activating OATH OTP (by enrolling an authenticator app) can be done on several occasions:
- After receiving a hard copy activation letter including the activation QR-code.
- During the authentication flow, when the end-user is prompted to migrate to OATH OTP as second factor authentication.
- During a self-registration flow performed by a new end-user, where the end-user selects OATH OTP as an additional authentication method.
- As part of protected self-services, where the end-user has the opportunity to activate an (additional) OATH OTP authenticator app.
The activation letter can be ordered in the Adminapp, see also section “Token management” further below. To configure the other three use cases, you have to add the OATH OTP Activation Step to the respective flows. See the following instructions.
Activating OATH OTP during an authentication flow
In the authentication flow use case, the end-user will be prompted to migrate to OATH OTP as second factor authentication when logging in to your application. Proceed as follows to configure this use case:
- Go to
Loginapp >> Applications and Authentication >> <your application> >> Authentication Flow - In the Steps list, create or edit a Migration Selection Step plugin (below the Selection Step plugin for second factor selection).
- In the Migration Selection Step plugin dialog, go to the Basic Settings section. In the Available Options list, create and edit a Simple Migration Selection Option plugin, as follows:
- Display Name field: Give the plugin an easily recognizable display name, such as
Migration to OATH OTP. - Target Auth Method field: Specify
OATH_OTPas the target authentication of the migration. - Steps list: Create and edit an OATH OTP Activation Step plugin, as follows:
- Display Name field: Give the plugin an easily recognizable display name, such as
Activate OATH OTP. - OATH OTP Settings field: Select the previously defined OATH OTP Settings plugin.
- Overwrite Existing Shared Secret: This checkbox specifies whether to overwrite an already existing OATH OTP shared secret associated with the respective end-user. This property can be used for two purposes: Either to create a new shared secret or to display an existing secret to register an additional device.
- If the Overwrite Existing Shared Secret property is enabled (the default), IAM will replace the existing shared secret by a new shared secret when enrolling a (new) authenticator app. As a consequence, the end-user can no longer use already activated authenticator apps based on the “old” secret. This is of use if the end-user's OATH OTP device is lost or has been stolen: It prevents third parties from illegally using the already enrolled authenticator app on the lost or stolen device.
- If the Overwrite Existing Shared Secret property is disabled, IAM will read the existing shared secret from the database and reveal it to the end-user when enrolling a new authenticator app. In this case, it is possible to continue using already activated OTP tokens (authenticator apps) based on the existing secret. This makes sense if an end-user wants to enroll an additional authenticator app in the protected self-services.
- Functional limitation
The above is only possible for authenticator apps using time-based OTP (TOTP).
For an authentication flow, we recommend keeping the Overwrite Existing Shared Secret property enabled.
- Display Name field: Give the plugin an easily recognizable display name, such as
- Activate your configuration.
- You have now enabled the activation of OATH OTP during the authentication flow.
Activating OATH OTP during self-registration
In the self-registration use case, the end-user can select OATH OTP as additional authentication method, when self-registering to your application. Proceed as follows to configure this use case:
- Go to
Loginapp >> Self-Registration >> <default flow> - In the Steps list of your default self-registration flow, create or edit a Selection Step for User Self-Registration plugin.
- In the Selection Step for User Self-Registration plugin dialog, go to the Basic Settings section. In the Available Options list, create and edit a Selection Option for User Self-Registration plugin, as follows.
- Display Name field: Give the plugin an easily recognizable display name, such as
OATH OTP Registration. - Name field: Enter a name for this option (e.g.,
OATH_OTP_ACTIVATION). - Condition field: Enter
Always True. - Steps list:
- Create and edit an OATH OTP Activation Step plugin as described in step 6 of the previous instructions (“Activating OATH OTP during an authentication flow”). Note that the setting of the property Overwrite Existing Shared Secret has no effect in the self-registration use case: Because the respective end-user is new and has no OATH OTP account yet, IAM will always create a new OATH OTP secret.
- Create and edit a Set Authentication Method Step plugin, to set the default authentication method for the self-registering end-user. In the plugin's Basic Settings, select
OATH_OTPas User Auth Method.
- Return to the User Self-Registration Flow plugin dialog. In the Steps list, create a User Persisting Step plugin, if it is not there yet.
- In the User Persisting Step plugin dialog, go to the Basic Settings section. In the Token Insertion Handlers list, add an OATH Token Insertion Handler plugin. Keep the default settings.
- Activate your configuration.
- You have now enabled the activation of OATH OTP during a self-registration flow.
Activating OATH OTP in protected self-services
The protected self-services use case allows activating an (additional) OATH OTP authenticator app in protected self-services. Proceed as follows to configure this use case:
- Go to
Loginapp >> Protected Self-Services >> Protected Self-Service Flows - In the Flows list, create and edit a Custom Protected Self-Service Flow plugin, as follows:
- Display Name field: Give the plugin an easily recognizable display name, such as
OATH OTP Registration Flow. - Flow ID field: Define a unique ID for this flow, e.g.,
oath-otp-activation. - Steps list: Create and edit an OATH OTP Activation Step plugin as described in step 6 of the instructions “Activating OATH OTP during an authentication flow” above. In the protected self-services use case, it is useful to disable the Overwrite Existing Shared Secret property, allowing the end-user to register several authenticator apps in the protected self-services, based on the same shared secret.
- All other settings: Keep the default values.
- Display Name field: Give the plugin an easily recognizable display name, such as
- Activate your configuration.
- You have now enabled the activation of an (additional) OATH OTP authenticator app in protected self-services.
Events
The OATH OTP Activation Step plugin triggers two events. Which event is activated, depends on the value of the step's Overwrite Existing Shared Secret property:
- The OATH OTP Secret Viewed event is triggered, when the Overwrite Existing Shared Secret property is disabled (
false), and the end-user has an existing OATH OTP shared secret that is exposed to the end-user during the OATH OTP activation process. - The OATH OTP Secret Added event is triggered on two occasions:
- If the end-user does not have an OATH OTP shared secret yet.
- If the end-user does have a shared secret, but the Overwrite Existing Shared Secret property is enabled (
true) (the default property setting).
For more information, see Event producers and Event attributes.
Token management
Establishing an OATH OTP account
You establish an OATH OTP account for an end-user in the Adminapp. For this, go to the Authentication Methods tab in the details view of the respective end-user. In the section Add New Authentication Method, add OATH OTP as new authentication method.
Upon establishment of the OATH OTP account for the end-user, an OATH OTP tab appears in the end-user's details view:
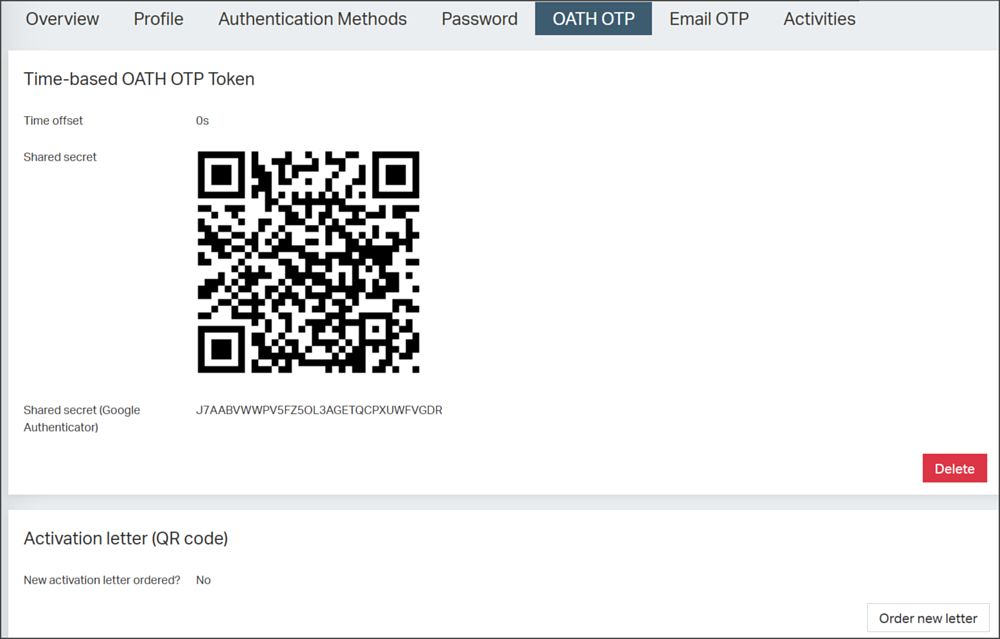
Possible actions in the OATH OTP tab:
- Delete: Clicking the Delete button will delete the OATH OTP account of the respective end-user, rendering their associated OATH OTP devices unusable. This action cannot be undone. Note that only administrators with the approprate roles can perform the Delete action.
- Order new letter: Clicking this button will order an activation letter, usually a PDF, including a QR code with which the end-user can enroll an authenticator app. The letter is generated by the IAM service container task OATH OTP Letter Task at the scheduled time and stored in a pre-configured directory (e.g.,
instances/auth/pdfs/). - Risk
The letter containing the OATH OTP activation QR code should point out that the QR code is a sensitive piece of information, which can be (mis)used to activate multiple authenticator apps: Anyone with access to the QR-code letter can enroll the OATH OTP token on their smartphone. Therefore, the letter should either be securely stored or destroyed after use.
Displaying the shared secret
The OATH OTP tab in the above screen shot shows the shared secret of the respective end-user, in QR code format and as a digit. By default, the shared secret is not displayed in the tab. To view this sensitive information, you must have specific access rights to the Adminapp. You can configure this as follows:
- Go to
Adminapp >> Access Control - In the Role-based Access Control plugin dialog, go to section Authentication Token Management and scroll to the View OATH OTP Token Secret field. Enter the administrator roles that you want to allow viewing the OATH OTP token secret.
- Activate your configuration.
Creating a new shared secret
If you order an activation letter for the same end-user multiple times, IAM will reuse the existing shared secret associated with this end-user's OATH OTP account for each ordered letter. If you want to create a new shared secret (e.g., because the end-user lost the activation letter before enrolling a new device), you must perform the next steps:
The new shared secret will replace the end-user's “old” shared secret. As a consequence, the end-user can no longer use already activated authenticator apps based on the “old” secret.
- Go to the OATH OTP tab. Click the Delete button to delete the existing OATH OTP account of this end-user.
- Go to the Authentication Methods tab. In the section Add New Authentication Method, add OATH OTP as new authentication method.
- Return to the OATH OTP tab and order a new activation letter.