Transaction approval with email OTP
The following example illustrates the transaction approval of 3rd-party system that uses Airlock IAM for authentication and transaction approval with email OTP.
Flow diagram
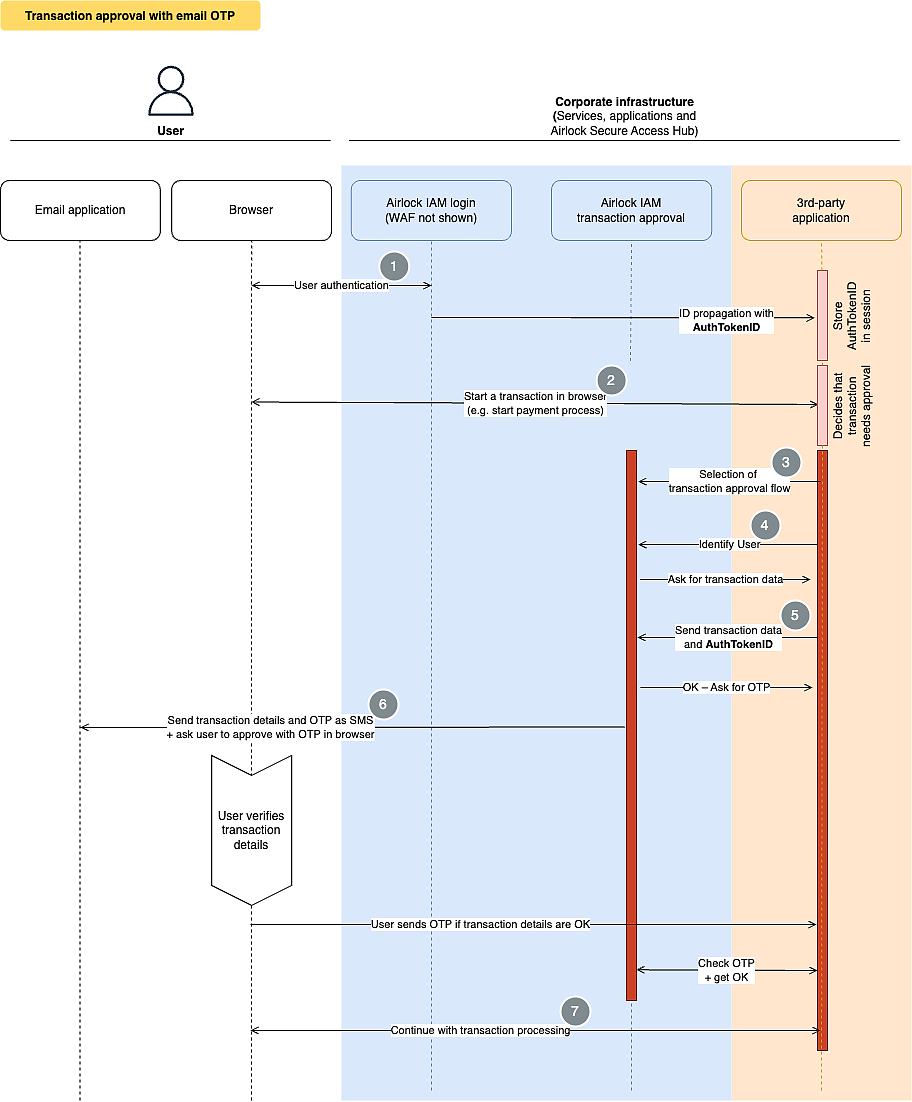
- (1)
User authentication and identity propagation:
- The end-user authenticates over Airlock IAM.
- The AuthTokenID is sent to the 3rd-party application as part of the identity propagation.
- The 3rd-party application stores the AuthTokenID in its session. It is used to select the appropriate authentication factor (here: email OTP) during transaction approval.
- (2)
Transaction approval decision by 3rd-party application:
- The end-user interacts with the 3rd-party application and starts a transaction (e.g. enters a payment).
- The 3rd-party application decides that approval is necessary for the transaction and thus starts the transaction approval process.
- (3)
Selection of transaction approval flow:
- The 3rd-party application decides which Airlock IAM transaction approval flow to use.
- (4)
User identifying step:
- The 3rd-party application calls the Airlock IAM transaction approval REST API and identifies the end-user.
- If the end-user is valid and not locked, Airlock IAM asks the 3rd-party application to provide transaction data to be verified.
- (5)
Parameter Step:
- The 3rd-party application sends transaction data to Airlock IAM. It also sends the AuthTokenID.
- Airlock IAM verifies the transaction data and asks the 3rd-party system to send the OTP code.
- (6)
Approval step:
- Airlock IAM formats the transaction data using the configured message provider.
- Airlock IAM sends the transaction data to the end-user's email address using the configured email service.
- The end-user verifies the transaction data in the email and enters the email OTP into the browser of the the 3rd-party application, to approve the transaction.
- Airlock IAM verifies the OTP for the 3rd-party application.
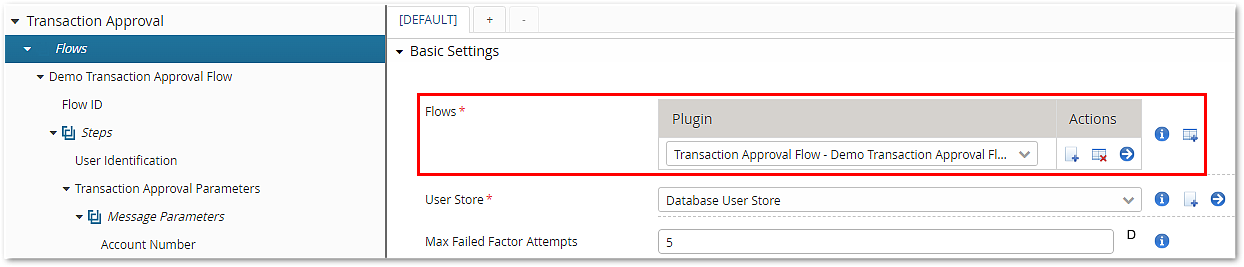
Configuration
The behavior and steps involved in the process are configured in an Airlock IAM transaction approval flow, similar to the authentication flows in the Loginapp.
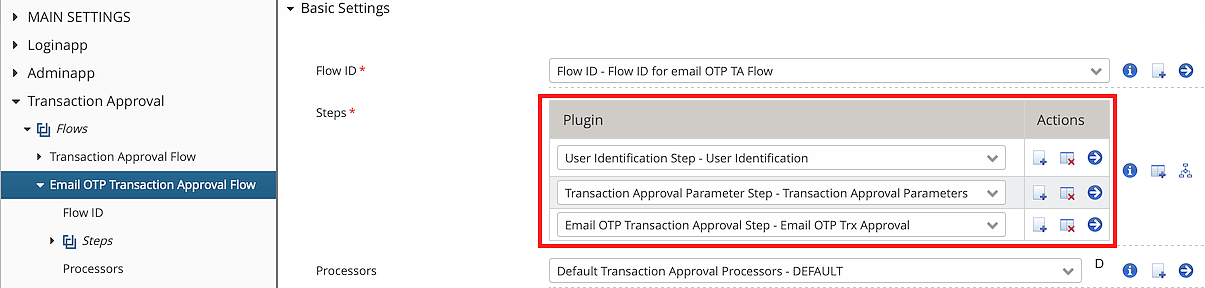
As described above, the transaction approval process usually consists of the following steps:
- REST selection request of the back-end application – this has to be configured on the corresponding back-end.
- The User Identification Step, to identify the end-user in IAM.
- The Transaction Approval Parameter Step, in which the back-end sends transaction details to IAM.
- The Email OTP Transaction Approval Step, to verify the OTP code towards the corresponding back-end.
The configuration of this example (using email OTP) is as follows:
Rest call sequence
The following REST call sequence shows how to use the transaction approval API from a REST client's point of view.
In this simplified example:
- Authentication information (e.g. Basic Auth header) and other HTTP headers are not shown.
- An AuthTokenId is not used in this example.
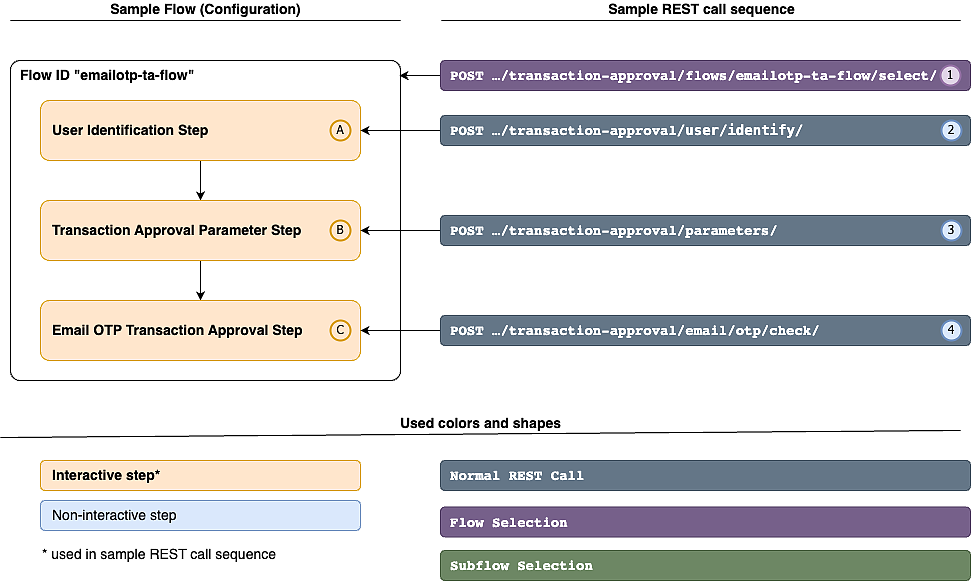
According to the flow diagram above, the HTTP REST requests and responses are as follows:
Step | Request/response type | HTTP request/response |
|---|---|---|
Step 1 | HTTP request – Flow selection | POST https://internal-iam-host.com/auth-transaction-approval/rest/transaction-approval/flows/emailotp-ta-flow/select/ |
HTTP response - Flow selection | HTTP/1.1 200 OK
{
"meta": {
"type": "jsonapi.metadata.document",
"timestamp": "2025-03-07T08:19:09.206+01:00"
},
"data": {
"type": "transaction-approval.session",
"id": "340125027183557164",
"attributes": {
"nextStep": "USERNAME_REQUIRED"
}
}
} | |
Step 2 | HTTP request – User identifying step | POST https://internal-iam-host.com/auth-transaction-approval/rest/transaction-approval/end-user/identify/
{
"end-username" : "jdoe"
} |
HTTP response – User identifying step | HTTP/1.1 200 OK
{
"meta": {
"type": "jsonapi.metadata.document",
"timestamp": "2025-03-07T08:19:13.012+01:00"
},
"data": {
"type": "transaction-approval.session",
"id": "340125027183557164",
"attributes": {
"nextStep": "PARAMETERS_REQUIRED"
}
}
} | |
Step 3 | HTTP request – Send transaction details | POST https://internal-iam-host.com/auth-transaction-approval/rest/transaction-approval/parameters/
{
"messageParameters" :
{
"accountNumber" : "0123456",
"amount" : "9999",
"currency" : "CHF"
}
} |
HTTP response – Send transaction details | HTTP/1.1 200 OK
{
"meta": {
"type": "jsonapi.metadata.document",
"timestamp": "2025-03-07T08:19:16.528+01:00"
},
"data": {
"type": "transaction-approval.session",
"id": "340125027183557164",
"attributes": {
"nextStep": "EMAIL_OTP_CHECK_REQUIRED",
"emailAddress": "jdoe@airlock.com",
"resendPossible": false
}
}
} | |
Step 4 | HTTP Request - Check OTP | POST https://internal-iam-host.com/auth-transaction-approval/rest/transaction-approval/email/otp/check
{
"otp" : "123456"
} |
HTTP Response - Check OTP | HTTP/1.1 200 OK
{
"meta": {
"type": "jsonapi.metadata.document",
"timestamp": "2025-03-07T08:19:42.222+01:00"
},
"data": {
"type": "transaction-approval.session",
"id": "340125027183557164",
"attributes": {}
}
} |