Configuration of IAM mappings
If you have not upgraded to Airlock IAM 8.6 yet, use the Airlock Gateway mapping templates that correspond to your currrent IAM version:
This article explains how to upload and adapt mapping templates for the Airlock IAM modules in the Airlock Gateway Configuration Center. A mapping template is a pre-configured mapping between a virtual host and a back-end application. It defines all the necessary rules, exceptions, and security settings required to get the application up and running. Mapping templates enable rapid configuration of complex back-end applications while maintaining maximum security.
Basic mapping templates are available for the Loginapp, Adminapp and Transaction Approval modules. Each template covers all features of the respective module. To create a mapping based on a template, follow the instructions below.
Uploading mapping templates to Airlock Gateway
Follow these steps to upload a mapping template to Airlock Gateway:
- Download the appropriate mapping template:
Airlock Gateway 8.3
Airlock Gateway 8.4 and newer
IAM Loginapp mapping template
iam-loginapp-8.6.0-mapping-template-for-gateway-8.3.zip
Related OpenAPI specification: login-rest-openapi-8.6.0.json
iam-loginapp-8.6.0-mapping-template-for-gateway-8.4-and-newer.zip
Related OpenAPI specification: login-rest-openapi-8.6.0.json
IAM Adminapp mapping template
iam-adminapp-8.6.0-mapping-template-for-gateway-8.3.zip
Related OpenAPI specification: admin-rest-openapi-8.6.0.json
iam-adminapp-8.6.0-mapping-template-for-gateway-8.4-and-newer.zip
Related OpenAPI specification: admin-rest-openapi-8.6.0.json
IAM Transaction Approval mapping template
iam-transaction-approval-8.6.0-mapping-template-for-gateway-8.3.zip
Related OpenAPI specification: transaction-approval-rest-openapi-8.6.0.json
iam-transaction-approval-8.6.0-mapping-template-for-gateway-8.4-and-newer.zip
Related OpenAPI specification: transaction-approval-rest-openapi-8.6.0.json
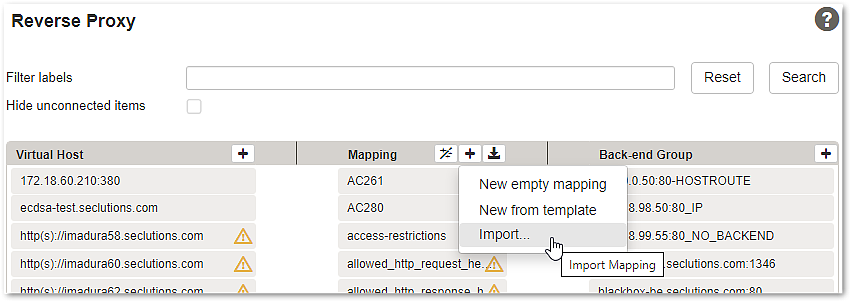
- In the Airlock Gateway Configuration Center, go to:
Application Firewall >> Reverse Proxy - Import the downloaded mapping template:
- This will add the following new and unconnected mapping templates to the mapping list:
IAM Module
Mapping template
Description
Loginapp
Airlock-IAM-LoginappBasic Loginapp mapping.
Used for all IAM Loginapp features including REST APIs.
Adminapp
Airlock-IAM-AdminappBasic Adminapp mapping.
Used for all basic IAM Adminapp features including REST APIs.
Airlock-IAM-ServicecontainerBasic mapping for the Airlock IAM Service Container.
Used for the Service Container services, such as the Radius Authentication Service and the Task Scheduler Service.
Transaction Approval
Airlock-IAM-Transaction-ApprovalBasic mapping for the Airlock IAM Transaction Approval module.
Used for all features of the Transaction Approval module, including REST APIs.
Adapting the basic Loginapp mapping
After uploading, adapt the basic template Airlock-IAM-Loginapp as follows:
- Set the entry- and back-end paths:
- Change the entry path to your needs. The default value
/auth/will work with most Airlock IAM tutorials and is recommended to be used. - Change the back-end path to point to the corresponding Loginapp instance's context path (for example
/prod-login/).
To find out the context path of a Loginapp, use the following CLI command:
- Change the entry path to your needs. The default value
Example for instance
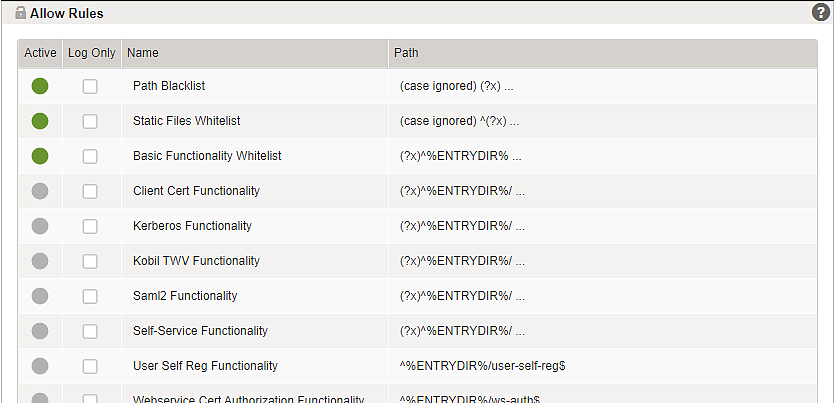
auth:- Go to the Allow Rules tab and activate the allow rules corresponding to all required Loginapp functionalities. For security reasons, only activate the necessary allow rules.
Example:
- Connect the Airlock IAM mapping to a virtual host and a back-end group.
- Activate the configuration.
Protecting IAM REST APIs with the API Enforcement feature
- The Airlock Gateway's API Enforcement feature validates each REST request against the API's OpenAPI specification (OAS).
- For each IAM version, OpenAPI specification (OAS) files are provided for the Loginapp, the Adminapp, and the Transaction Approval module. These documents enforce an upstream validation of all REST calls to and from the respective IAM module.
- The corresponding REST endpoint paths are defined directly in the respective basic mappings.
- See OpenAPI specification and validation on how to use the OpenAPI specification for IAM.
API enforcement must be licensed separately and enabled explicitly in Airlock Gateway. If you do not want to use API enforcement, you could leave this feature disabled.
When upgrading Airlock IAM, remember to update the OpenAPI specification accordingly.
Behavior change as of Gateway 8.4
In Gateway 8.3 and earlier, enforcing upstream validation of all REST API calls against OpenAPI specifications required separate mappings. Starting with Gateway 8.4, these additional mappings are no longer necessary. Instead, the OpenAPI settings are configured directly within the basic mappings.
The following mappings are no longer required starting from Gateway 8.4
Airlock-IAM-Loginapp-REST-Protected: Loginapp REST API mapping for protected callsAirlock-IAM-Loginapp-REST-Public: Loginapp REST API mapping for public callsAirlock-IAM-Adminapp-REST: Mapping for calls to Adminapp REST API clients
This change introduces a slightly different behavior in the case of blocked REST requests. Previously, a blocked REST request would return the error page directly. Now, it triggers a 303 See Other response that redirects the client to the appropriate error page.
Migrating from Gateway 8.3 to 8.4 and higher
If you are migrating from Gateway 8.3 to Gateway 8.4 or higher, you can safely remove the REST API mappings listed above. Instead, configure the OpenAPI settings directly within the basic mappings. For more information, see OpenAPI specification and validation.
If you prefer, you can continue using the Gateway 8.3 mapping templates along with the additional REST API mappings. This may be useful, for example, if your REST API mappings include special (OpenAPI) settings and integrating them into the basic mapping would require significant effort.
CSRF protection
CSRF token protection of Airlock Gateway:
- The Airlock Gateway CSRF token protection feature is activated on all Loginapp REST mappings using the mapping template 7.6 and newer.
- This may require small changes to custom single-page applications to handle possible CSRF blocks. If this is not possible, the CSRF protection on these mappings can be disabled to return to the previous behavior.