Token management (Airlock 2FA)
This article shows how to manage Airlock 2FA tokens for users.
Goal
- Understand how Airlock 2FA can be enabled for a user.
- Understand how to manage Airlock 2FA tokens.
- Learn how to prepare a user for migration to Airlock 2FA.
- Learn how to generate an activation letter for an Airlock 2FA user.
Initial thoughts
The following examples use the Adminapp. A REST API for all administrative actions of the Airlock IAM Adminapp is available.
- All administrative actions shown below are subject to access control.
- We assume that the administrator working with the Adminapp has the necessary privileges to perform the actions. To verify this, review both your access control configuration in the Config Editor and the roles assigned to the respective administrator in the Adminapp (administrator's details view)
- Info
The access control configuration is defined in the Role-based Access Control dialog in the Config Editor (Adminapp >> Access Control). You assign administrator roles to administrative actions in this dialog.
Prerequisites
- The IAM Adminapp is configured and working.
- The Airlock 2FA Token Controller plugin is configured in the Config Editor. This plugin allows the management of an end-user's Airlock 2FA account in the Adminapp.
Setting Airlock 2FA as second factor
This section shows how to set Airlock 2FA as second authentication factor for a specific end-user in the Adminapp.
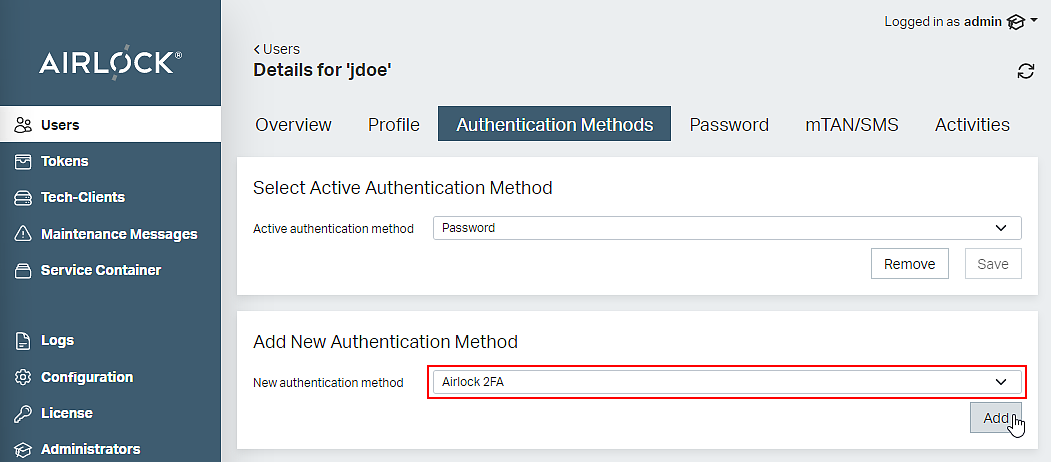
Proceed as follows (see also the screen shot below):
- In the Users section of the Adminapp, search for the relevant end-user. Select the Authentication Methods tab in the user's details view.
- In section Add New Authentication Method, select Airlock 2FA and click the Add button.
- In section Select Active Authentication Method, select Airlock 2FA and click the Save button.
- The user now has an Airlock 2FA account. Note that the end-user must first enroll an Airlock 2FA device before they can use it to log in.
Preparing the user to migrate to Airlock 2FA
This section shows how to prepare an end-user to migrate to Airlock 2FA as second authentication factor in the Adminapp. The next time the end-user logs in to your application, they will be prompted to migrate to the Airlock 2FA authentication method.
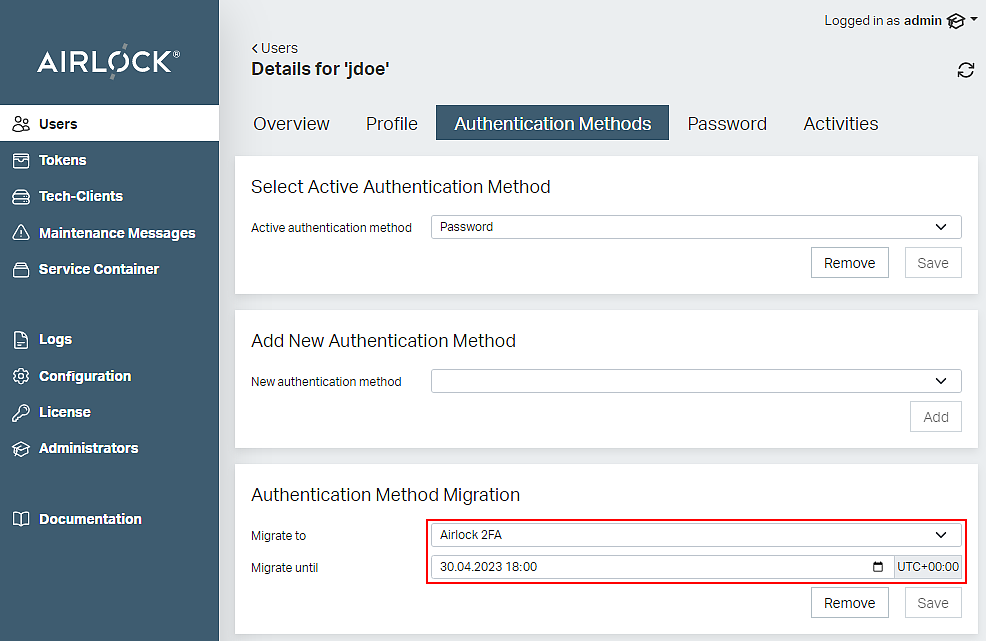
Proceed as follows:
- Ensure that the Authentication Method Migration section is visible in the Adminapp. This is a setting in the Config Editor:
- In the Config Editor, go to
Adminapp >> Users - Go to section User Details Page - Authentication Tokens (Credentials).
- Enable the check box Show Migration Selection.
- Activate your configuration.
- In the Config Editor, go to
- In the Users section of the Adminapp, search for the relevant end-user. Select the Authentication Methods tab in the end-user's details view.
- Select Airlock 2FA in the Authentication Method Migration section (see also the next screenshot).
- Optionally set a due date in the field Migrate until.
- Click the Save button
- The user is now asked to migrate to Airlock 2FA at the next login.
It is possible to perform the above procedure for multiple users at a time using the bulk change feature.
The bulk change feature is enabled in the Config Editor:
Adminapp >> Users >> Allow Bulk Changes.
Airlock 2FA token management
The following screenshot shows the Airlock 2FA tab for a specific end-user in the Adminapp. The tab contains information on the end-user's Airlock 2FA account and -device, and an activation letter (if available).
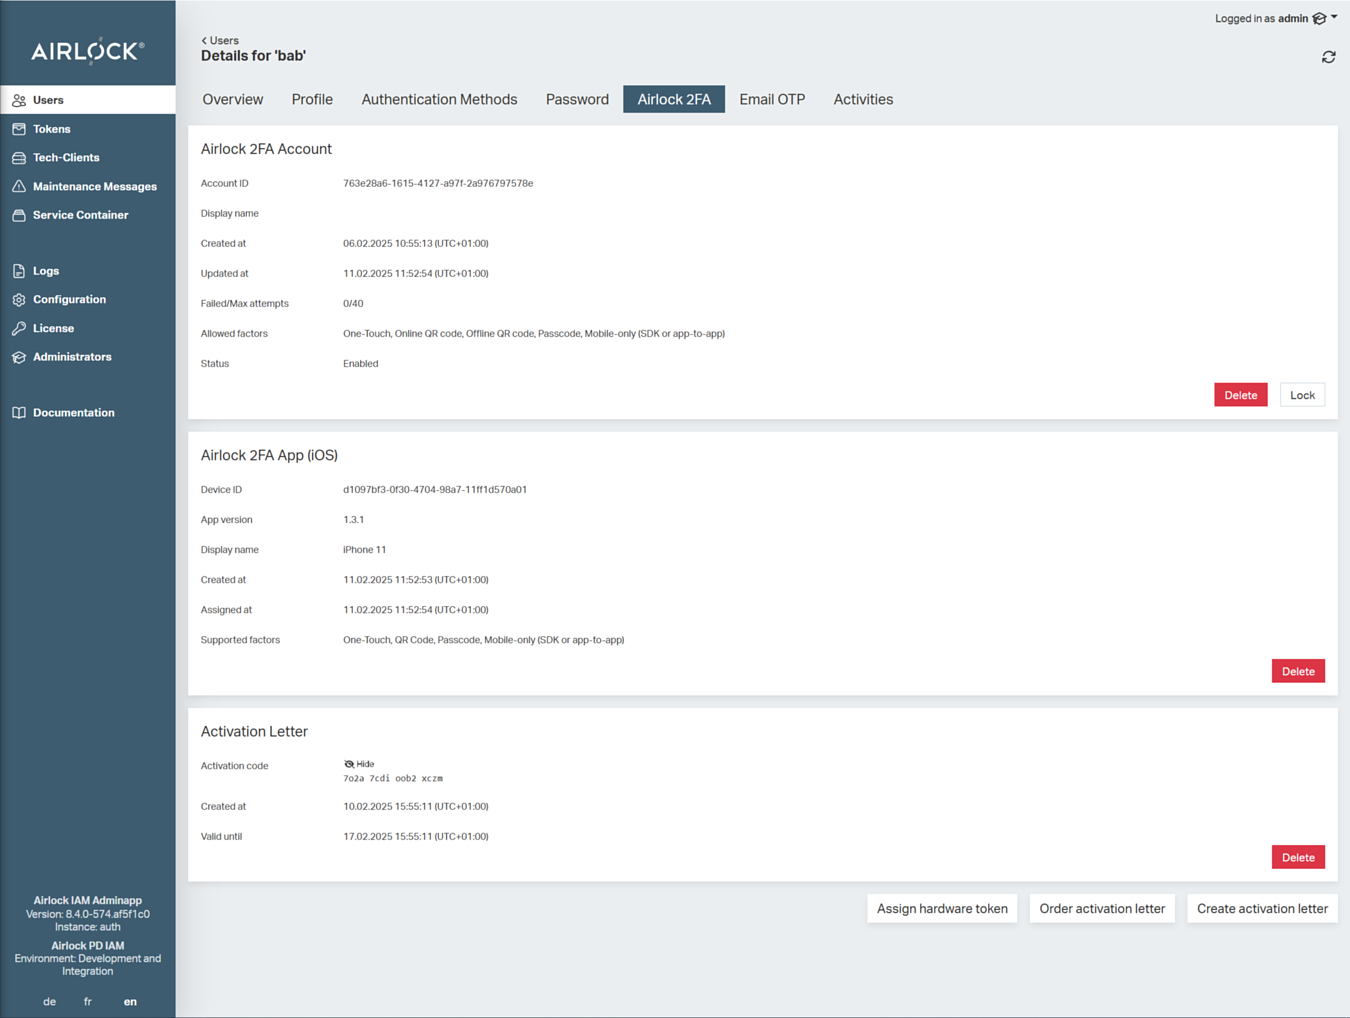
The tab contains the following sections:
Section Airlock 2FA Account
This section shows the details of the Airlock 2FA account of the respective end-user, such as creation date and failed login attempts. The account ID corresponds with the ID of this user's account in the Futurae cloud.
Possible actions:
- Lock (or Unlock):
When locked, Airlock 2FA tokens can no longer be used for authentication or transaction approval. - Delete:
This will remove Airlock 2FA including all devices. It will also remove the corresponding account in the Futurae cloud. - Notice
This action cannot be undone.
Section Airlock 2FA App (iOS/Android)
This section lists the enrolled Airlock 2FA devices (tokens) of the respective end-user. It shows details such as creation (activation) date and device display name. The device ID corresponds with the device ID in this user's account in the Futurae cloud.
The section is only visible if this end-user has any enrolled Airlock 2FA devices.
Possible actions
- Delete:
This will remove the corresponding token. The Airlock 2FA account still remains and new tokens can be enrolled by the user. - Notice
This action cannot be undone.
Section Activation Letter
This section shows the activation letter(s) available for the respective end-user to activate a new Airlock 2FA device. It is possible to have more activation letters at once for one user. Once an activation letter has been consumed, it disappears from the section. If no active activation letter is available for this end-user, the section is not visible.
The displayed activation letters include a 16-digit activation code, with which an end-user can enroll a new 2FA device without having to scan a QR code. In this case, the help desk or counter staff has to read out the code to the end-user, who can then enter the code in the 2FA app.
Note that the 16-digit activation code is visible only to admin roles that have the View Airlock 2FA Activation Secret action assigned. For this, open the Config Editor and go to Adminapp >> Access Control, section Authentication Token Management. Assign the required admin roles to the View Airlock 2FA Activation Secret action.
Possible actions:
- Delete:
Deleting an activation letter will remove the pending enrollment from the Futurae cloud, and make the QR code on the corresponding paper letter useless. This action is necessary if the activation letter is lost or stolen before the end-user could enroll the Airlock 2FA app and activate their token. It prevents an unintended third party who found/stole the letter from illegally enrolling their device. - Notice
This action cannot be undone.
To delete an Airlock 2FA activation letter, the permission Delete Authentication Token is required. By default, this permission is available only for Adminapp administrators with the role tokenadmin or superadmin. To assign the permission to another Adminapp role, open the Config Editor and go to Adminapp >> Access Control, section Authentication Token Management.
- Notice
Be cautious to whom to assign this permission - deleting a user token may have far reaching consequences. For more information on assigning permissions to roles, see Access Control.
Buttons
- Create activation letter: Creates an activation letter and stores the generated PDF in the pre-configured directory (e.g., instances/auth/pdfs/). Additionally, the activation letter appears in the section Activation Letter of the Airlock 2FA tab.
- Order activation letter: Orders an activation letter that is generated by the corresponding service container task at the scheduled time. After generation, the letter appears in the section Activation Letter of the Airlock 2FA tab.
Limitations
- Modification of Airlock 2FA accounts directly in Futurae's management web application should be avoided. This is because data regarding activation letters are stored in the Airlock IAM database only and because Airlock IAM does not support all features that can be managed in the Futurae cloud.