Configuration snippets
A configuration snippet is a modular IAM configuration unit representing a part of a larger configuration. Snippets enable automated composition of IAM configurations by dividing them into manageable units.
This article describes what snippets are, how they are created, and how they are used.
What is a configuration snippet?
Technically, a snippet is a YAML IAM configuration file with the type IamSnippet (instead of the type IamConfig). A snippet is organized exactly like a normal IAM configuration. Please refer to the YAML format specification for further details on the file format itself.
A snippet can contain any number of plugins or trees thereof. It is up to the author of the snippet how to divide a larger configuration into snippets.
Consider the following example snippet. It contains two simple and independent plugins.
schemaVersion: iam.airlock.com/v1
type: IamSnippet
metadata:
  iamVersion: '8.4'
  history:
  - datetime: 2025-01-31T08:51:39.046Z
    author: marc
    comment: Snippet Example 1
spec:
- type: TagConfigImpl
  id: emailOtpVerifiedTag
  properties:
    name: EMAIL_OTP_VERIFIED
- type: Alphabet
  id: mtanIakAlphabet
  displayName: Alphabet for mTAN activation keys
  comment: Do not include chars that look alike.
  properties:
    characters: ABCDEFGHJKLMNPQRSTUVWXYZ23456789
Main properties of a snippet:
- The snippet has the type
IamSnippet - It must adhere to the YAML format specification
ids are not required. However, specifyids for plugins that need to be referred to when connecting them to the rest of the configuration. See note below.- A snippet must not include dangling references, i.e.,
refs referring to plugins that are not part of the snippet. References within the snippet are valid.
Short vs. long plugin type identifiers
Note that the above example contains short plugin types.
In Airlock IAM 8.4, fully-qualified class names are required as type identifiers (like com.airlock.iam.servicecontainer.app.application.configuration.TaskSchedule).
Short plugin type identifiers are supported as of IAM 8.5.
Snippet templates
There are two ways to create a snippet: manually or with the help of the Config Editor. Both ways require a text editor - ideally one with YAML support - and one of the following YAML template files.
- Creating a snippet manually is feasible for simple snippets with only a few plugins or small plugin trees. Just cut and paste the snippet part from YAML file into a snippet template file and adjust it as needed. The YAML templates in the plugin config reference may also be used: plugin-docs.html.
- Creating a snippet with the Config Editor is the recommended way for creating more complex snippets containing a lot of plugins, complex plugin trees, and links between plugins. This approach is explained in more detail below.
Minimal snippet template:
Snippet template with history item:
Creating snippets with the Config Editor
Complex snippets are best created with the Config Editor and a text editor or IDE. You may want to use the Config Editor's standalone mode to edit snippets independently of IAM instances.
To create a snippet using the Config Editor, use the following steps as a guide:
General approach using a base configuration
Since IAM configurations can become quite complex, we recommended developing the snippet contents in a base configuration. By base configuration, we refer to the configuration (or a typical such configuration) into which the snippet is later imported.- Open the base configuration in the Config Editor
- Remove unconnected plugins
Make sure there are no unconnected plugins in the base configuration: If there are unconnected plugins, delete them from the base configuration. In the “Unconnected Plugins” view, there is a button (the bin icon) to do this. - Configure snippet plugins
Configure all plugins that should later be part of the snippet. - The added plugins are disconnected from the base config in the following step. It may therefore make sense to add a comment like “TODO: disconnect” for all added plugins so they are easier to find.
- Use the validation feature of the Config Editor to make sure the resulting configuration is valid.
- Test the resulting configuration if possible.
- Disconnect snippet plugins
Disconnect all plugins that should become part of the snippet. If you marked the plugins with “TODO: disconnect”, use the search function in the Config Editor to find all plugins. - Download configuration
Download the configuration from the Config Editor. For the following steps, the downloaded file is calledbase-config-with-snippet-plugins.yaml. Open it in a text editor or IDE. Ideally, the editor is YAML-aware and allows you to collapse whole YAML trees. - The downloaded file contains all connected plugins from the base configuration plus all snippet plugins in the unconnected part of the configuration.
- Locate snippet plugins
Locate the beginning of the list of unconnected plugin trees in the YAML file.
Since all unconnected plugin trees are located after the top-level IAM modules (Loginapp, Adminapp, Service Container, Transaction Approval, API Policy Service) it is easiest to collapse all YAML trees from the top until you hit the first item that is not a top-level IAM module. This should be a plugin intended for the snippet.
After collapsing the top-level IAM modules, the configuration should look like this. In the example below, the collapsed trees are marked with an “[...]” at the end of the line. Also, an empty line has been added to the example before the first snippet plugin to make it more clear. - Example
schemaVersion: iam.airlock.com/v1 type: IamConfig spec: - type: GlobalConfiguration[...] - type: Loginapp[...] - type: TransactionApprovalApp[...] - type: Server[...] - type: TheFirstSnippetPluginInTheList ... - type: TheLastSnippetPluginInTheList
- Info
Parent plugins in list of unconnected plugins
Note that the list of unconnected plugins may also contain “parent plugins” that do not belong to the snippet. This is the case if the inheritance feature is used and a parent plugins is exclusively referred to via the parent link (and not referenced in any other way).
To find parent plugins, search for “
parentRef:” in the non-snippet part of the configuration and check whether the referred-to parent is in the unconnected plugin list. - Copy snippet plugins into snippet template
Select and copy all plugins from the first snippet plugin down to the last line of the configuration file. This is the list of all snippet plugins. The file is referred to assnippet.yamlin the following. Use one of the above snippet templates and paste the copied list of plugin trees into the template. The resulting file - sticking to the above example - then looks like the following example. - Example
schemaVersion: iam.airlock.com/v1 type: IamSnippet metadata: iamVersion: '8.4' spec: - type: TheFirstSnippetPluginInTheList ... - type: TheLastSnippetPluginInTheList
- The snippet file now contains all plugins of the snippet including references within the plugin. However, there may be dangling references that have to be eliminated in the next steps.
- Identify dangling references
Dangling references arerefs to plugins outside the snippet (in our case they refer to plugins from the base configuration). To find the dangling references, use the config validation CLI. It will output the list ofids of dangling references as in the following example: - Example
iam config validate -f snippet.yaml


Error loading configuration: Unable to load the configuration from file: snippet.yaml:
Invalid plugin references found: idOfAPlugin-xyz, idOfAnotherPlugin-abc
Alternatively, you can also upload the
snippet.yamlto the Config Editor while watching the Config Editor's log file (adminapp-parsable.log). It will also contain the list of dangling references.- Eliminate dangling references
Open thesnippet.yamlin a text editor or IDE and search for the dangling references (idOfAPlugin-xyz,idOfAnotherPlugin-abcin the above example). For each dangling reference, one of the following options exist:
- Remove the dangling reference (delete the
ref: xxx): this option is correct if the target of the reference is typically in the base configuration and must not be part of the snippet. For example, the database connection settings are typically not part of the snippet but part of the target configuration file in which the snippet is to be imported.
After importing the snippet into the target configuration, such references must be established manually or using the CLI commandiam config connect. In large snippets, it may be helpful to keep track of the references that need to be re-established when importing the snippet. One way to do this is by using the comment attribute: - Example
... type: Airlock2FARepositoryConfig id: airlock2faRepository comment: TODO connect property "sqlDataSource" to database connection plugin properties: storageEncryptionConfig: ... - Inline the referenced plugin (copy the plugin from the base configuration to the snippet): this option is correct if the referenced plugin should be part of the snippet. It may be ok to introduce a bit of redundancy to make the snippet more self-contained and therefore reduce the need for connecting plugins after importing the snippet.
- Remove the dangling reference (delete the
- Remove unnecessary IDs
Remove unnecessaryids from the snippet: it may make sense to remove all unnecessaryids from the snippet. It makes the snippet more robust to ID collisions. This is especially important for snippets that are designed to be imported into a base configuration multiple times (e.g. a target application template). Although the CLI commandiam config import-snippetis capable of resolving ID collisions it may make sense to removeids that are neither required for internal nor external references to a plugin. - Test the snippet
To test the resulting snippet either use the CLI commandiam config import-snippet(possibly followed byiam config connectcommands) or upload the snippet in the Config Editor while having the base configuration open. Choose the option “Import snippet into the current config” if asked by the Config Editor).
Note that importing a snippet into a base configuration does not automatically connect the imported snippets.
Editing a snippet with the Config Editor
The Config Editor can be used to edit a snippet by uploading it. You may also drag and drop the snippet file onto the plugin tree on the left side in the Config Editor.
Edit a snippet using the Config Editor
- Open the base configuration in the Config Editor
- Upload the snippet using the Upload button or drag and drop the snippet file onto the plugin tree on the left.
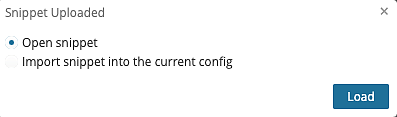
- In the dialog, select the option Open snippet.
- Click the Load button
- The snippet is now displayed in the Config Editor. Note that because it is a snippet and another an entire configuration, some features (such as activation) are disabled in the Config Editor.
- After editing the snippet, use the Download button to store the adapted snippet.
Importing snippets with the Config Editor
One or more snippets can be imported into a configuration with the Config Editor by just uploading the snippet. You may also drag and drop the snippet file onto the plugin tree on the left side in the Config Editor.
Using the Config Editor to import snippets is useful for manually composing a configuration based on a base configuration and some snippets. It also serves as a starting point when automating configuration composition.
Import a snippet using the Config Editor
- Open the base configuration in the Config Editor
- Upload the snippet using the Upload button or drag and drop the snippet file onto the plugin tree on the left.
- In the dialog, select the option Import snippet into the current configuration.
- If loading the snippet fails because of ID collision, enter a suffix in the input field. The ID will be appended to all colliding snippet plugin IDs.
- If loading the snippet fails because of colliding display names, check Rename display name on conflict.
- Click the Load button
- The plugins from the snippet are now part of the base configuration. Note that they are not connected automatically. You need to go through the configuration to connect plugins where needed.

Using snippets with the CLI (import and connect)
To automate configuration composition, i.e., creating a configuration from a base configuration and one or more snippets, the config CLI commands are used.
See Configuration CLIs for further information.
It is recommended to test the snippet import and connecting plugins using the config editor when developing automated configuration composition.
Hints for automated configuration composition:
- Use the
iam config import-snippetcommand to import a snippet into a base configuration. - Note the commands collision handling options for IDs and display names. Use
iam config import-snippet --helpto get more information. - After importing one or more snippets, use the
iam config connectcommand to connect plugins from the snippet to the base configuration and vice versa. - Use the
iam config validatecommand to validate the resulting configuration. If the configuration is not valid, it is advisable to fail already during the configuration composition and not as late as during the deployment.
Example
The following example takes a base configuration without Airlock 2FA plugins, then imports a snippet containing various Airlock 2FA plugins and connects some of them to the base configuration.
d#!/bin/bash

# IMPORT SNIPPET
# import snippet "airlock-2fa.yaml" into "iam-config.yaml"
./iam config import-snippet -f iam-config.yaml airlock-2fa.yaml


# CONNECT PLUGINS
# (1) connect Airlock 2FA Settings in MAIN SETTINGS >> Authentication Settings and connect it where required
./iam config connect plugin -f iam-config.yaml -s airlock2FA-mainSettings -d mainAuthenticationSettings -p airlock2FASettings
./iam config connect plugin -f iam-config.yaml -s h2-demo-datasource -d airlock2FA-dbRepository -p sqlDataSource
./iam config connect plugin -f iam-config.yaml -s contextDataEmail -d airlock2FA-AccountDisplayNameProvider -p contextDataName
./iam config connect to-list -f iam-config.yaml -s airlock2FA-dbConsistenyListener -d usersOnDb.persister -p userChangeEventListeners --index=0

# (2) connect Airlock2FA as second factor
./iam config connect to-list -f iam-config.yaml -s airlock2FA-SelectionOption -d demoAuthFlow.2ndFactorSelection -p availableOptions --index=0

# (3) connect adminapp token controller
./iam config connect to-list -f iam-config.yaml -s airlock2FA-tokenController -d adminappUsersConfig -p credentials

# (4) connect letter task schedule
./iam config connect to-list -f iam-config.yaml -s airlock2FA.letterTaskSchedule -d taskSchedulerSettings -p tasks


# VALIDATE RESULTING CONFIGURATION
./iam config validate -f iam-config.yaml
# Abort if the configuration is not valid
if [ $? -ne 0 ]
then
  echo "Aborting because configuration not valid"
  exit 1
fi
Notes on the choice of plugin IDs:
- When connecting plugins to properties of other plugins, IDs, and property names are used.
- While property names are defined by Airlock IAM, the IDs can be chosen arbitrarily.
- The example shows that it is important to choose sensible IDs. Well-chosen IDs make scripts more readable and easier to maintain.
- If developing base configurations and snippets across teams, it is crucial to agree on IDs to make the configuration files compatible.
Upgrading snippets and its limitations
Like regular configuration files, snippets can also be automatically migrated from one IAM version to another. This is done using the iam upgrade CLI.
Limitations
- There may be single config upgrade steps that take multiple plugin trees into account at once when upgrading. In such cases - depending on how the configuration was split into snippets - upgrading may not be possible and must be done manually.
- IAM can only automatically migrate IAM configuration files (regular configuration files and snippets) but not the config automation scripts (such as the above shell script example). Code manipulating the configuration must be migrated manually. Changes to the configuration are documented with each IAM release (starting with IAM 8.4).
Further information and links
- Plugin config reference: plugin-docs.html
- YAML format specification
- Configuration CLIs
- Standalone Config Editor mode: IAM Config Editor (UI)