Configuration and usage
Introduction to configuring and using configuration contexts
In the following, the example screenshots and texts are based on the following simple example:
- All clients (browsers) with the client IP in the range
192.168.0.0/24are in the contextINTRANET - All other clients use the
DEFAULTcontext. - The example only covers the Loginapp.
The following steps are required to make use of configuration contexts:
- Configure context retention policy
- Configure context extraction.
- Define contexts and the context retention policy.
- Define context-specific values.
Step 1: Configuring retention policy
Airlock IAM supports two strategies with context retention:
- The Request Context Retention Policy plugin expects to set the context for each request. This policy works well with IP Context Extractor or with URL Context Extractor, since IP Addresses and URLs are not expected to change in the middle of a flow.
- The Session Context Retention Policy plugin expects to set the context with the first request of a flow and then have the context remain unchanged. This policy works well with an HTTP Query Parameter Context Extractor, where only the first request is sent with an additional query parameter.
- Go to
Loginapp >> Advanced Settings >> Context Retention Policy - Add a Request Context Retention Policy plugin for this sample use case.
The Session Context Retention Policy plugin supports an Allow Change property. This property determines if the context is fixed for the entire session or if it could be changed at a later point in time.
Step 2: Configuring extraction
A context extractor plugin must be configured so Airlock IAM can determine the configuration context of the current request.
- go to
Loginapp >> Advanced Settings >> Context Extractor - Add a new context extractor plugin and configure it according to your requirements.
For our example, add a new IP Context Extractor plugin and configure it accordingly.
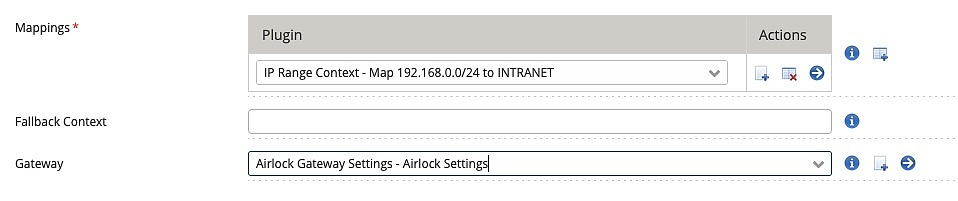
Each Context Extractor plugin supports a Fallback Context parameter. This parameter determines how a context extractor will respond if no match is found.
Leaving the Fallback Context parameter empty is particularly useful when you combine a Session Context Retention Policy with an enabled Allow Change property. This allows for the configuration of a setup where the context can be set differently at the start of each flow. For example, it is possible to have an authentication flow used in one context and a password reset flow in a different context.
Context extraction is defined similarly in the Transaction Approval and the API Policy Service modules.
Step 3: Defining contexts
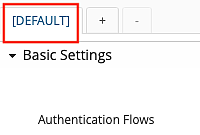
Configuration contexts have to be explicitly defined in the Config Editor. The default context always exists and does not have to be added. It is visible as the [DEFAULT] tab just above the properties of each plugin.
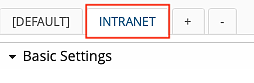
To add a new context (e.g. INTRANET), click on the + next to the context tabs and enter the name of the context. Then click the Create button.
The new context INTRANET is now visible as a tab in all plugins used in a module supporting contexts (Loginapp, Transaction Approval, API Policy Service).
Step 4: Defining context-specific values
To define a context-dependent value for any property in the configuration:
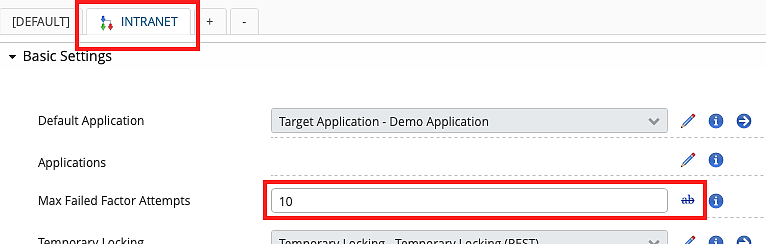
- Select the corresponding context tab above the properties list (INTRANET in our example).
- Click on the overwrite icon (pencil) to overwrite the value inherited from the default context.
- Edit the desired value (in the example below, the Max Failed Factor Attempts value is set to 10 for the context INTRANET)
- Remember, that configuration contexts are only used in the Loginapp, the Transaction Approval, and the API Policy Service modules. Defining context-dependent values for other modules (Adminapp, Service container) has no effect.
- Do not forget to activate the configuration changes
- You can use the plugin Static Context Extractor to test whether the configured context-dependent values are as desired.