This article shows a more complex user management extension example involving an input form and calling REST API endpoints.
Prerequisites
- The following preconditions must be met to be able to go through the example:
- The example is based on the Hello World Example. Set up and run Hello World example first.
- The example uses mTAN-related Admin REST API endpoints. The mTAN/SMS Token Controller must therefore be configured in Adminapp >> Users >> Authentication Tokens (Credentials).
Feature Overview
- The code in the example below does the following:
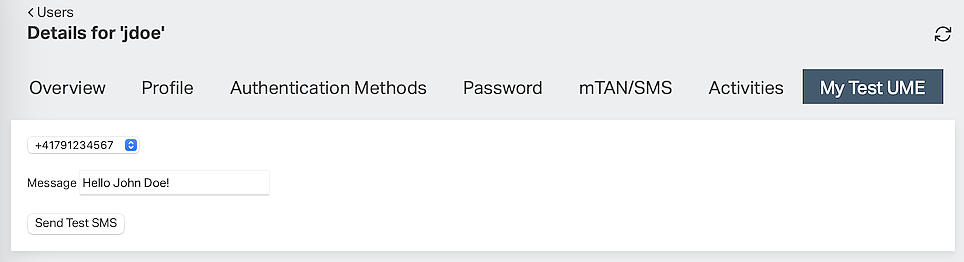
- Render an input form with a phone number selection drop-down, an input field for a message, and a send button.
- Load the user's mobile phone numbers by calling an Airlock IAM REST API.
- Send an SMS message to the selected phone number by calling an Airlock IAM REST API.
- Translate labels using the UME API call
translate(). - The UME tab is only shown if the Airlock IAM REST API returns at least one phone number for the user.
The UME looks as follows (assuming the user has at least one active mTAN number):
JavaScript code
The following JavaScript code implements the described user management extension.
- Note the following:
- Styling information is not included in the example.
- Some text elements are written directly in the JavaScript code, some are translated using the
translate()method. - REST calls are made using the context path
/auth-admin/. This only works if the IAM instance is calledauth, the browser can directly call the Adminapp (no reverse proxy), and if the context path of the IAM Adminapp has not been altered in theinstance.propertiesfile. - Replace the JavaScript code from the Hello World example to try out the code. All the rest - including UME ID and access control settings do not have to be changed.
copy
class SendMessageUME extends UserManagementExtension {
    mTanDevices = [];
    user = iam.api.userManagementExtension.userId();

    sendMessageButtonId = "ume-sendMessage-send-message"
    deviceInputId = "ume-sendMessage-device";
    messageInputId = "ume-sendMessage-message"

    shouldShow() {
        return fetch(`/auth-admin/rest/users/${this.user}/tokens/mtan`, {"headers": {"X-Same-Domain": "1"}})
            .then(response => response.json())
            .then(json => {
                this.mTanDevices = json.data?.map(elem => {return {id: elem.id, label: elem.attributes?.label || elem.attributes?.phoneNumber}});
                return json.data?.some((elem)=> elem.attributes?.active);
            });
    }

    onUserLoaded() {
        this.setDeviceSelection();
    }

    render(node) {
        node.innerHTML = this.messageForm();
        document.getElementById(this.sendMessageButtonId).addEventListener('click', () => this.sendMessage());
        this.setDeviceSelection();
    }

    setDeviceSelection(){
        if(document.getElementById(this.deviceInputId)){
            document.getElementById(this.deviceInputId).innerHTML = `${this.mTanDevices.map(elem => `<option value="${elem.id}">${elem.label}</option>`)}`;
        }
    }

    messageForm() {
        return `
        <div>
            <label for="numberSelection">Select phone number:</label>
            <select name="numberSelection" id="${this.deviceInputId}"></select>
        <div>
            <label for="message">${iam.api.translate("logviewer.results.header.message")}</label>
            <input type="text" name="message" id="${this.messageInputId}">
        </div>
        <input type="button" id="${this.sendMessageButtonId}" value="${iam.api.translate("user.mtan.sendTest.button")}"/>
      `
    }

    sendMessage() {
        if (this.getMessage().trim().length < 1) {
            alert(iam.api.translate("error.validation-failed.required"));
            return;
        }

        this.disableDefaultForm(true);

        fetch(`/auth-admin/rest/users/${this.user}/tokens/mtan/${this.getDevice()}/send-sms/`,
            {
                method: 'post',
                headers: { "X-Same-Domain": "1", "Accept": "application/json", "Content-Type": "application/json" },
                body: JSON.stringify({ message: this.getMessage() }),
            })
            .then(response => {
                if (response.status !== 204) {
                    alert(iam.api.translate("error.title"))
                }else{
                    alert(iam.api.translate("general.feedback.changes-applied"))
                }
                this.disableDefaultForm(false);
            })
    }

    getDevice() {
        const elem = document.getElementById(this.deviceInputId) ;
        return elem[elem.selectedIndex].value;
    }

    getMessage() {
        return document.getElementById(this.messageInputId).value;
    }

    disableDefaultForm(disabled) {
        [this.sendMessageButtonId, this.deviceInputId, this.messageInputId].map(id => {
            document.getElementById(id).disabled = disabled;
        });
    }
}

iam.api.userManagementExtension.register("myTestUME", new SendMessageUME());
Testing the UME and troubleshooting tips
- To test the UME:
- Log into the Adminapp with a user entitled to view user details and see the UME (depends on access control settings above).
- Open the user details of a user in the user management.
- The tab My Test UME should now be displayed.
- Click on the tab to see the UME. It should look like in the screenshot above.
Once the UME is displayed you may adapt the JavaScript code and the text elements at runtime. Only press the reload button in the browser to load the latest changes from the files.
Troubleshooting tips
- If the tab is not shown, check the following:
- Review the access control settings in the configuration and check whether the logged-in admin user has the roles to view the UME.
- Check if the ID of the UME is exactly the same in the configuration (Adminapp >> Users >> User Management Extensions) and in the JavaScript file
user-management-extensions.js. - Make sure the
user-management-extensions.jsfile has the correct name, is in the right folder, and can be read by Airlock IAM (ownership and permission of file and folder it is contained in). A browser console error will be thrown if the UME JS file cannot be found or if the referred ID is not registered within that file.
- If the UME does not work as expected:
- Open the browser's JavaScript console, reload the browser page and check for errors in the console.
- Add
console.log()ordebugger;statements to the UME lifecycle methods to find out if methods are called as expected.