Use case: Email OTP authentication flow configuration

This use case describes the configuration of the Email OTP Authentication Step. It assumes that there is a valid target application configuration with a Username Password Authentication Step.

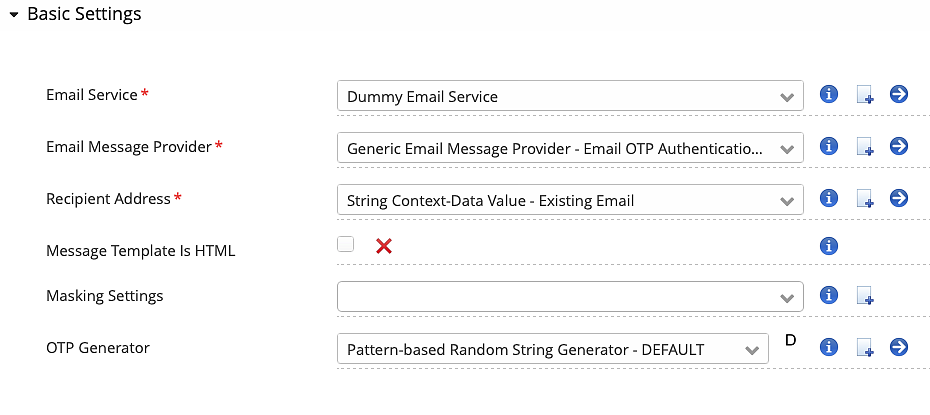
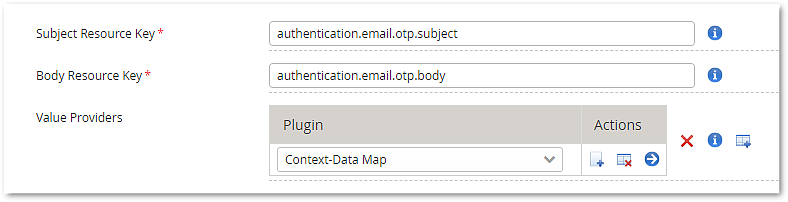
The following configuration example features the new Email OTP Authentication Step that has been implemented with Airlock IAM 7.7. The new implementation allows multi-lingual subject and body texts with variables.

The old email OTP authentication step has been renamed to Legacy Email OTP Authentication Step and is still available.

Prerequisites

  • Adminapp and Config Editor access is required.
  • A user account with a password and email address must exist in the IAM database.
  • A valid target application configuration exists.
  • An authentication flow with a Username Password Authentication Step exists for the target application.

Configuration

  1. In the Config Editor, go to:
    Loginapp >> Applications and Authentication >> target application >> Authentication Flow
  2. After the Username Password Authentication Step, add a new Email OTP Authentication Step plugin.
  3. Open the plugin details and configure the following in the Basic Settings section:
  4. email otp plugin settings
  5. Open the Generic Email Message Provider details and configure the following:
    • As Subject Resource Key, set the value authentication.email.otp.subject.
    • As Body Resource Key, set the value authentication.email.otp.body.
    • As Value Provider, select (or create) the plugin Context-Data Map: it makes all user context data available in the message template (e.g. first and last name of the end-user).
    • As
  6. Back in the Email OTP Authenticator Step: Value for the property Recipient Address should be of type String Context-Data Value. In the plugin's property Context Data Field, a reference to the user's email address must be made.
  7. In this flow step order, an email with OTP will be sent after username/password login as 2nd factor.

Testing

After authentication with username and password, the email OTP is sent using the configured email service plugin: In this example, this is the Dummy Email Service which just writes the email body into the log file.

  1. Open the Loginapp and log in with the test user credentials (username/password).
  2. After login, a dummy email with OTP is created.
  3. Open the Logs section in the Adminapp, select the Loginapp in the Application drop-down, and search for email OTP.
  4. A log message saying Sent email to "<email-address>" with OTP is displayed.

Customizing email texts

The subject and body of the email sent to the end-user can be customized. It is also possible to add variables supported by the configured value provider (here: context data) to personalize the email.

It is strongly recommended to personalize emails to allow the end-user to verify that the email is authentic. Do so, for example, by including the first and last name of the end-user.

Never send sensitive information in emails.

  1. Read out the text resource keys that are subject to customization
  2. Open the plugin details of the previously configured Email OTP Authentication Step.
  3. In the Basic Settings section, click to open the Generic Email Message Provider plugin details.
  4. The current subject and body resource keys are shown:
  5. text resources for translations
  6. Use the resource keys to look up the default texts and copy them to custom language properties files. See Customizing non-UI-related text elements in the Loginapp REST API for more details.
  7. The email subject and body texts can be individually customized.
  8. Make your (static) text changes in the custom language properties files.

Add variables to email texts

All values made available by providers (in the example above, it is just the context data elements of the user) can be used as variables in subject and body texts.

The following example shows a personalized salutation including the context data items givenname, surname, username, and email. Note that the TOKEN variable is always available and corresponds to the OTP token to be entered.

Dear ${givenname} ${surname}\n\nYour security code for the user ${username} with the email address ${email} is: ${TOKEN}.\n\nYour IAM Team

The set of available context data is defined in the Loginapp's user store: Loginapp >> User Store. Other information can be made available by adding more Value Providers to the list in the Generic Email Message Provider.